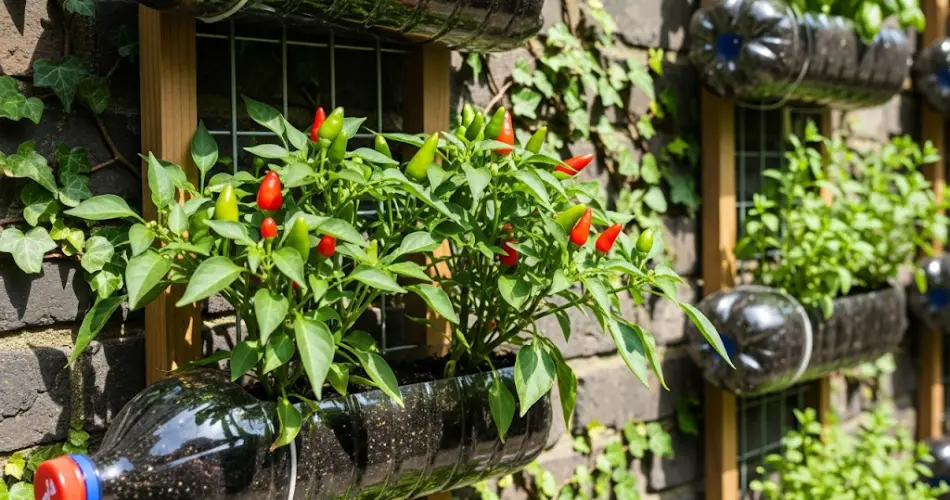
Hot peppers add bold flavor to dishes and bright color to gardens—and the good news is, you don’t need a large plot of land to grow them. With just a few plastic bottles and a sunny wall, you can grow your favorite chili varieties in a vertical garden. This method is perfect for apartment dwellers, small-space gardeners, and anyone looking to recycle creatively.
Bottle wall gardens use repurposed containers mounted on walls, fences, or racks to grow crops vertically. Hot peppers thrive in this setup because they love warmth, sunlight, and well-drained soil—all of which a properly designed hanging garden provides.
Why Hot Peppers Work Well in Bottle Gardens
Hot peppers (such as cayenne, jalapeño, Thai chili, and habanero) are excellent candidates for wall-mounted bottle gardening for several reasons:
-
Compact Growth Habit: Many hot pepper plants stay small and bushy.
-
Heat-Loving: Hanging on a wall gives them access to full sun and warmth.
-
Minimal Soil Requirements: Their roots don’t require deep containers.
-
Attractive Foliage and Fruits: Makes your garden space functional and beautiful.
-
Continuous Harvest: With good care, you can enjoy peppers for months.
The success of this setup relies on giving each plant enough root space, moisture, and sunlight. With a few simple steps, you’ll have an eye-catching and productive bottle wall garden.
What You’ll Need
Gather the following supplies to start growing hot peppers in hanging bottles:
-
2 to 5-liter plastic bottles (clear or colored)
-
Sharp utility knife or scissors
-
Nail, screwdriver, or drill for drainage holes
-
Quality potting soil with compost
-
Pepper seeds or seedlings
-
Liquid fertilizer or compost tea
-
Twine, wire, or zip ties for hanging
-
A sunny wall, fence, or wooden pallet frame
Preparing the Bottles
-
Clean and Cut the Bottles
Rinse bottles thoroughly. Use a knife or scissors to cut a rectangular opening on one side for planting, leaving enough of the bottle intact to hold soil and support the plant. Keep the bottle cap on but poke a small drainage hole in it. -
Create Drainage Holes
Poke 3–5 small holes at the base and cap area using a nail or drill. This prevents water from pooling and causing root rot. -
Mounting the Bottles
Use wire, zip ties, or twine to fasten bottles to a wall, fence, or trellis. You can place them horizontally or vertically, but leave enough space (at least 10–12 inches) between each bottle so the plants have airflow and room to grow. -
Add Potting Mix
Fill each bottle with a high-quality potting mix enriched with compost or worm castings. Avoid using garden soil, as it may compact and hinder drainage.
Planting Hot Peppers
You can either start from seed or transplant seedlings. If starting from seed, sow 2–3 seeds about 1/4 inch deep in each bottle. Thin to the strongest plant after germination. For transplants, gently place one seedling per bottle, firm the soil around the roots, and water well.
Position the bottle garden where it will receive at least 6 hours of direct sunlight daily. South-facing walls are ideal. The heat radiating off the wall helps peppers flourish.
Watering and Feeding
Hanging bottles dry out quickly, especially in full sun. Check soil moisture daily. Water when the top inch of soil feels dry. Ensure excess water can escape through the drainage holes.
Feed your peppers every 2–3 weeks using a diluted liquid fertilizer or compost tea. Peppers benefit from phosphorus and potassium for flowering and fruiting, so choose a balanced or bloom-boosting formula.
Supporting the Plants
As your pepper plants grow and begin to bear fruit, their branches may get heavy. Tie them gently to the bottle or to the wall using soft ties or garden twine. This prevents branches from breaking under the weight of the peppers.
Pest and Disease Tips
Peppers grown in bottles are generally less prone to ground-dwelling pests, but you should still watch for:
-
Aphids
-
Spider mites
-
Whiteflies
If needed, spray plants with a mild soap solution or neem oil. Good airflow and proper watering reduce the risk of fungal diseases.
Harvesting Your Peppers
Most hot pepper varieties are ready to harvest 60–90 days after transplanting. Wait until the fruit reaches its mature color—usually red, orange, or yellow—depending on the variety. Use scissors or garden snips to avoid damaging the plant.
Regular harvesting encourages continued production. If you allow too many peppers to ripen and stay on the plant, it may slow down further fruiting.
Tips for Success
-
Choose pepper varieties suited for containers, like ‘Thai Hot’, ‘Cayenne’, or ‘Jalapeño M’.
-
Group your bottles in clusters by height and variety for even lighting and watering.
-
Keep pruning to a minimum—just remove damaged or crowded leaves.
-
Refresh the soil after each growing season for continued success.
Final Thoughts
Creating a bottle wall garden for hot peppers is an efficient, space-saving, and eco-friendly way to grow spicy crops right outside your door. With a handful of recycled bottles, some quality potting soil, and a sunny spot, you’ll soon enjoy the sight—and flavor—of fresh homegrown chilies dangling from your vertical garden. Whether you’re garnishing dishes or making homemade hot sauce, these hanging peppers pack both visual appeal and culinary punch.


