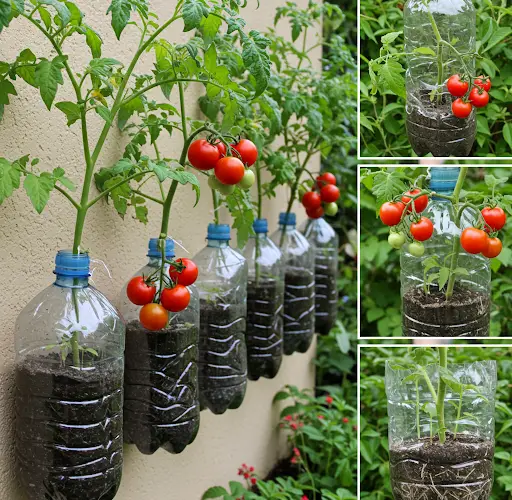
How to Grow Tomatoes Using Plastic Bottles – High Yields Without Daily Watering
Tomatoes are one of the easiest and most rewarding vegetables to grow at home, especially when you use creative methods that conserve water and space. One such method uses plastic bottles as self-watering systems, reducing the need for constant care while producing an abundance of fruit.
This technique is perfect for busy people or beginner gardeners. With a few recycled materials and some patience, you can enjoy a steady supply of fresh, juicy tomatoes right from your backyard, balcony, or even a sunny indoor window.
Why Use Plastic Bottles to Grow Tomatoes?
Plastic bottles offer a smart and sustainable way to manage water usage and improve plant health. When used properly, they act as built-in irrigation systems that provide steady moisture to the roots without drowning them. This method reduces the risk of overwatering and keeps your tomatoes hydrated, even during hot days or while you’re away.
Other benefits include:
-
Water efficiency: Minimizes water waste and evaporation.
-
Root zone hydration: Delivers water directly where it’s needed most.
-
Fewer watering tasks: Ideal for people who forget to water or travel often.
-
Upcycling: Reuses common household waste in a productive way.
Materials You’ll Need
To start growing tomatoes using plastic bottles, gather the following items:
-
Tomato seedlings (cherry or medium-sized varieties work best)
-
Large plastic containers or grow bags
-
Empty plastic bottles (1.5L or 2L soda bottles work well)
-
Potting soil rich in organic matter
-
Compost or slow-release fertilizer
-
A knife or scissors to cut the bottles
-
Sunlight (6–8 hours per day)
Optional: support sticks or tomato cages for vertical growth.
Step-by-Step Guide
1. Prepare the Plastic Bottles
Rinse and clean your plastic bottles thoroughly. Then:
-
Use a knife or scissors to cut small holes around the bottom half of each bottle. These will allow water to seep out slowly.
-
Remove the cap and cut off the base if you plan to refill from the top.
-
You can also leave the cap on and poke tiny holes in it if you prefer to refill from the bottom via suction.
These bottles will act as buried water reservoirs next to your tomato plants.
2. Set Up Your Planting Container
Fill your grow bag or large pot with loose, fertile soil mixed with compost. If planting in the ground, dig small planting holes spaced about 18–24 inches apart.
Next, bury one plastic bottle beside each planting hole. Insert the bottle vertically, with the bottom (the part with holes) positioned near the root zone. Leave the top exposed for easy refilling.
3. Plant the Tomatoes
Place your tomato seedlings in the soil next to the buried bottle. Make sure the root ball is deep and stable, and gently pat down the soil around it.
As tomatoes benefit from being planted deep (to encourage more root growth), you can remove a few lower leaves and bury the stem up to the first set of real leaves.
4. Add Water and Let the System Work
Fill the buried bottles with water. The perforated bottle will slowly release moisture into the soil, delivering water directly to the tomato’s roots over time.
Depending on weather conditions and bottle size, you may only need to refill every 2–4 days. This significantly reduces the need for daily watering.
5. Sunlight and Support
Tomatoes thrive in full sun. Place your containers or garden bed in a spot that receives at least 6–8 hours of direct sunlight daily.
As the plants grow, use bamboo sticks, cages, or any sturdy vertical support to keep them upright and off the ground. This helps improve airflow and reduces the risk of disease.
6. Feeding and Maintenance
Feed your tomato plants every 2–3 weeks with compost tea or a balanced organic fertilizer. You can also place a bit of compost directly into the water bottles to deliver nutrients along with moisture.
Remove any yellowing leaves or side shoots (suckers) if you’re growing indeterminate varieties, to encourage larger fruit and better airflow.
7. Harvesting Your Tomatoes
Tomatoes are ready to harvest when they’re firm, fully colored, and slightly soft to the touch. Depending on the variety, this usually happens 60–85 days after planting.
Harvest regularly to encourage more fruit production throughout the season.
Tips for Success
-
Choose the right variety: Dwarf, bush, or cherry tomato varieties work great in containers.
-
Monitor moisture: Refill bottles more frequently in hot or dry weather.
-
Avoid over-fertilizing: Too much nitrogen can lead to leafy plants with few fruits.
-
Re-use and rotate: At the end of the season, wash and store your bottles for the next planting.
Final Thoughts
Growing tomatoes with plastic bottles is an efficient, eco-friendly gardening technique that works beautifully in small spaces. Not only does it reduce daily maintenance, but it also promotes healthy root development and steady yields. Whether you’re gardening on a patio, rooftop, or backyard, this simple method offers a big reward with minimal effort.
Try it once—and you might never go back to traditional watering again!