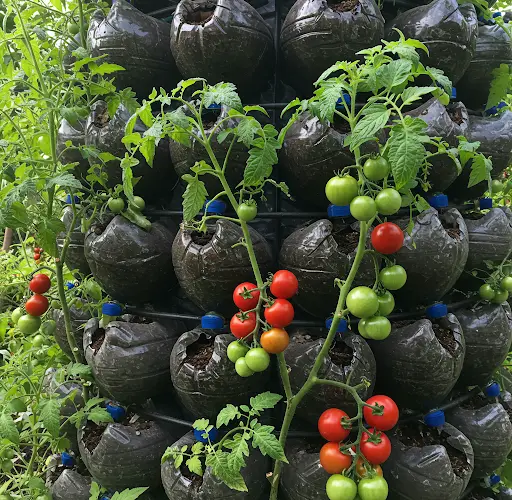
Growing Tomatoes in Plastic Bottles for High Yields: A Surprisingly Easy Method
Tomatoes are one of the most widely grown and consumed vegetables worldwide. Their versatility in cooking and nutritional benefits make them a staple in many households. If you lack garden space but still want to enjoy homegrown tomatoes, growing them in plastic bottles is an excellent solution. This method is cost-effective, environmentally friendly, and surprisingly easy to implement. By following a few simple steps, you can achieve a bountiful harvest without the need for large garden beds.
Why Grow Tomatoes in Plastic Bottles?
Using plastic bottles for growing tomatoes offers several advantages:
- Space-saving: Ideal for urban gardeners with limited space.
- Recycling: Reduces plastic waste by repurposing bottles.
- Water Efficiency: Helps retain moisture, reducing water wastage.
- Portability: Can be moved around to optimize sunlight exposure.
- Pest Control: Reduces the risk of soil-borne diseases and pests.
Materials Needed:
- Large plastic bottles (5-liter bottles work best)
- Sharp knife or scissors
- Good quality potting mix or compost
- Tomato seedlings or seeds
- Fertilizer (organic compost, liquid fertilizer, or slow-release granules)
- Watering can or spray bottle
- Sticks or stakes for plant support
- Drill or heated nail (for making drainage holes)
Step-by-Step Guide to Growing Tomatoes in Plastic Bottles
1. Preparing the Plastic Bottles
- Take a 5-liter plastic bottle and wash it thoroughly to remove any residue.
- Use a sharp knife or scissors to cut off the top portion of the bottle, creating an open-top container.
- Make several small holes at the bottom of the bottle for proper drainage.
- If you prefer a hanging garden, cut the bottom instead, hang the bottle upside down, and plant the tomato seedling through the spout.
2. Preparing the Soil Mix
- Use high-quality potting soil mixed with compost or organic matter to provide essential nutrients.
- A mix of equal parts compost, peat moss, and perlite ensures good aeration and drainage.
- Add slow-release fertilizer to promote steady growth.
3. Planting the Tomato Seedlings
- Fill the prepared plastic bottle with soil, leaving about 2 inches of space at the top.
- If using seeds, plant them about ¼ inch deep and cover lightly with soil.
- If using seedlings, dig a small hole, place the seedling, and gently firm the soil around it.
- Water the plant thoroughly but avoid waterlogging.
4. Providing Support
- As tomato plants grow, they need support to keep the stems upright and prevent breakage.
- Insert a small stake or stick into the bottle to support the plant as it grows.
- For hanging bottles, secure a trellis or use strings to tie the plant gently for support.
5. Watering and Maintenance
- Water the tomatoes regularly to keep the soil moist but not soggy.
- Morning watering is best to allow the plants to absorb moisture throughout the day.
- Mulching the surface with dried leaves or straw helps retain moisture and suppress weeds.
6. Fertilizing for High Yields
- Feed the plants with liquid fertilizer or compost tea every two weeks.
- A balanced fertilizer with nitrogen, phosphorus, and potassium ensures healthy foliage and fruit production.
- Avoid over-fertilizing with nitrogen, as it promotes excessive leaf growth instead of fruit.
7. Sunlight and Temperature Requirements
- Tomatoes require at least 6-8 hours of direct sunlight per day.
- Place the plastic bottles in a sunny spot on the balcony, terrace, or windowsill.
- If growing indoors, consider using grow lights to supplement natural light.
8. Pruning and Disease Prevention
- Remove lower leaves that touch the soil to prevent fungal diseases.
- Pinch off suckers (small shoots between main stems) to encourage fruit production.
- Check for pests like aphids or whiteflies and treat with neem oil or insecticidal soap if necessary.
9. Pollination for More Fruits
- If growing indoors, gently shake the plant or use a small brush to transfer pollen between flowers.
- Outdoor plants will attract natural pollinators like bees and butterflies.
10. Harvesting Your Homegrown Tomatoes
- Depending on the variety, tomatoes take about 60-90 days to mature.
- Harvest when the fruits are firm, brightly colored, and slightly soft to the touch.
- Use clean scissors or pruners to cut the tomatoes off the vine to avoid damaging the plant.
Conclusion
Growing tomatoes in plastic bottles is an innovative and practical way to cultivate fresh produce at home. Whether you have a small balcony, terrace, or even just a windowsill, this method ensures that you can enjoy a continuous supply of fresh tomatoes. By following these simple steps, you can maximize your yields, reduce plastic waste, and experience the joy of home gardening. Try this method today and enjoy delicious, homegrown tomatoes without the need for a large garden!