Tomatoes are a favorite among home gardeners for their versatility, flavor, and vibrant appearance—but if you’re looking for something extra special, rainbow tomatoes might be just the thing. These multicolored beauties don’t just look stunning—they’re also juicy, sweet, and packed with flavor. Best of all, you don’t need a big backyard to grow them. With the right approach, rainbow tomatoes can thrive in plastic containers, making them perfect for patios, balconies, and small spaces.
Whether you’re a seasoned gardener or a curious beginner, this guide will walk you through everything you need to know about growing rainbow tomatoes in containers—from selecting the right variety to harvesting succulent, colorful fruit.
Why Rainbow Tomatoes?
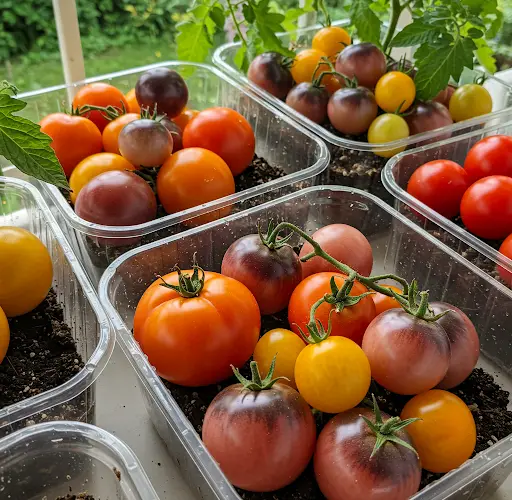
Rainbow tomatoes are not a single variety but rather a term used for tomatoes with multi-hued skins and flesh—ranging from purples and yellows to oranges, greens, and deep reds. Popular heirloom varieties like ‘Cherokee Purple,’ ‘Green Zebra,’ ‘Yellow Pear,’ and ‘Brandywine’ are often grown together to create a visually striking and diverse harvest.
These tomatoes are not only rich in color but also offer a complex flavor profile that blends sweetness, acidity, and depth. They’re perfect for salads, sandwiches, sauces, or eating fresh off the vine.
Why Grow in Plastic Containers?
Using plastic containers to grow tomatoes offers several advantages:
-
Space-saving: Ideal for urban gardening or those without ground space.
-
Portability: Containers can be moved to follow the sun or protect from storms.
-
Control over soil and drainage: Helps reduce disease risk and root problems.
-
Recycling: Reusing plastic buckets or pots helps reduce environmental waste.
What You’ll Need
To get started, gather the following:
-
5-gallon plastic containers (one per plant, with drainage holes)
-
Rainbow tomato seeds or seedlings (heirloom or mixed varieties)
-
High-quality potting soil or a custom mix
-
Organic fertilizer (compost, worm castings, or liquid feed)
-
Mulch (straw, leaves, or rice husks)
-
Tomato cages or stakes (for support)
Step 1: Choose the Right Container
Tomatoes need room to grow. A 5-gallon container is ideal for one tomato plant. Be sure to drill several drainage holes at the bottom to prevent waterlogging, which can lead to root rot.
Clean and sanitize the container before use, especially if it’s being reused, to reduce the risk of soil-borne diseases.
Step 2: Prepare the Soil
Tomatoes are heavy feeders that require rich, well-draining soil. Fill the container with a mix such as:
-
60% high-quality compost or aged manure
-
20% coco coir or peat moss (to retain moisture)
-
20% perlite or coarse sand (for aeration and drainage)
Mix in a handful of crushed eggshells and a tablespoon of wood ash or bone meal for added calcium and potassium—both essential for healthy fruit development.
Step 3: Planting the Tomatoes
Plant one seedling per container. When planting, bury the stem deeper than it was in the nursery pot—tomato stems can develop roots, which strengthens the plant and boosts nutrient uptake.
Water the soil thoroughly after planting and place the container in a sunny location. Tomatoes need at least 6–8 hours of sunlight daily.
Step 4: Feeding and Watering
Consistent watering is key. Keep the soil moist but not soggy. In hot weather, tomatoes in containers may need daily watering.
Feed every 10–14 days with a liquid organic fertilizer—such as compost tea, banana peel water, or fish emulsion. As fruit begins to set, switch to a fertilizer higher in potassium and phosphorus.
Step 5: Support and Maintenance
Use tomato cages, stakes, or trellises to support your growing plants. This keeps the fruit off the ground and helps airflow, reducing the risk of disease.
Prune the lower leaves and remove suckers (small shoots that grow between the main stem and branches) to encourage more fruit production and better air circulation.
Step 6: Mulching and Protection
Apply mulch around the base of the plant to:
-
Retain soil moisture
-
Prevent weed growth
-
Reduce temperature fluctuations
Keep an eye out for pests like aphids or whiteflies. A simple garlic or neem oil spray can help deter them without harming the plant.
Step 7: Harvesting Rainbow Tomatoes
Most rainbow tomato varieties are ready for harvest in 60–90 days, depending on the type. You’ll know the fruit is ripe when it has:
-
Fully developed color (based on variety)
-
A slight softness when gently squeezed
-
A sweet aroma near the stem
Pick tomatoes regularly to encourage continuous fruiting. Use garden shears or twist gently to avoid damaging the plant.
Final Thoughts
Growing rainbow tomatoes in plastic containers is not only possible but incredibly rewarding. This method brings color, flavor, and freshness to your home—even if you don’t have traditional garden space. By using recycled containers and organic practices, you’re creating a more sustainable garden while enjoying delicious results.
Whether you’re lining your balcony with tomato-filled buckets or starting a small rooftop garden, rainbow tomatoes are a beautiful, edible way to brighten your space and your meals.


