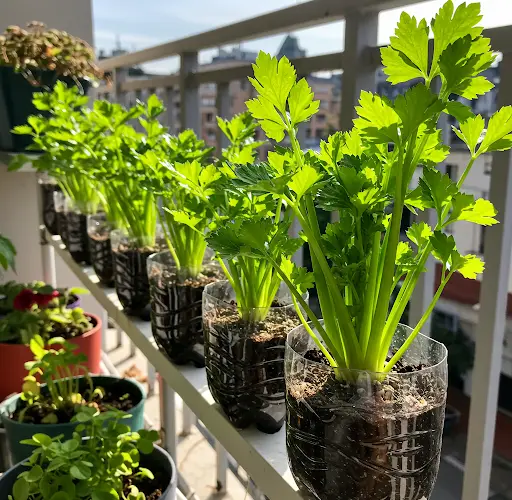
Growing Celery Doesn’t Cost Anything: Extremely Simple With Just Plastic Bottles
Celery is a versatile and nutritious vegetable that can be grown at home easily using recycled plastic bottles. Whether you have limited space or want to adopt a sustainable gardening method, this technique allows you to grow fresh, organic celery without spending a fortune. In this guide, we’ll walk you through the step-by-step process of growing celery in plastic bottles, along with tips on caring for your plants and harvesting a bountiful crop.
1. Why Grow Celery in Plastic Bottles?
- Cost-Effective: Uses recycled materials, reducing waste and expenses.
- Space-Saving: Ideal for balconies, patios, and small spaces.
- Eco-Friendly: Promotes sustainable gardening practices.
- Continuous Harvest: Allows you to cut and regrow celery multiple times.
- No Soil Needed: Can be grown in water or minimal soil using hydroponic techniques.
2. Materials Needed
- Plastic bottles (1.5L or larger, preferably transparent)
- Celery stalk with base (store-bought or homegrown)
- Water (filtered or tap water left to sit overnight)
- Scissors or knife
- Organic compost or potting mix (if growing in soil)
- A sunny spot or LED grow light
3. Step-by-Step Guide to Growing Celery in Plastic Bottles
Step 1: Preparing the Celery Base
- Buy or harvest a fresh bunch of celery with the base intact.
- Cut off the bottom 2 inches of the stalk and set it aside.
- Remove excess leaves from the base, leaving a few inner ones intact.
- Place the base in a shallow bowl of water, ensuring the cut side is facing up.
- Leave it in indirect sunlight for 5-7 days, changing the water every two days.
Step 2: Preparing the Plastic Bottle Planter
- Take a clean plastic bottle and cut it about 6 inches from the bottom.
- Poke a few small drainage holes at the bottom if using soil.
- If using hydroponics, leave the bottle intact and fill it with fresh water.
- Place the celery base into the bottle’s opening, ensuring the bottom is touching the water.
Step 3: Growing in Water vs. Soil
Growing Celery in Water (Hydroponics Method)
- Keep the bottle filled with fresh water, changing it every 3-4 days.
- Place the bottle in a sunny spot or near a grow light.
- You will start seeing new green shoots within a week.
- Transfer to soil after 2-3 weeks for a more robust plant (optional).
Growing Celery in Soil
- Fill the plastic bottle with potting mix or compost.
- Dig a small hole and plant the rooted celery base in the center.
- Water it lightly, keeping the soil moist but not soggy.
- Place in a sunny location for at least 6 hours a day.
Step 4: Caring for Your Celery Plants
- Water regularly, ensuring the roots don’t dry out.
- Feed with organic fertilizer once every two weeks.
- Trim outer leaves to encourage continuous growth.
- If growing hydroponically, add liquid nutrients for better development.
4. Harvesting Your Homegrown Celery
- Celery is ready to harvest in 8-12 weeks.
- Cut the outer stalks first, leaving the inner ones to continue growing.
- Use fresh in salads, soups, or smoothies for a healthy diet.
- You can repeat the process by re-growing a new base from the harvested celery.
5. Common Problems and Solutions
| Problem | Cause | Solution |
|---|---|---|
| Wilting leaves | Lack of water or nutrients | Keep soil moist and feed regularly |
| Slow growth | Insufficient sunlight | Move to a sunnier location or use grow lights |
| Yellowing stalks | Overwatering | Reduce watering frequency and improve drainage |
6. Final Thoughts: Grow Celery Easily at Home
Growing celery in plastic bottles is an innovative, sustainable, and cost-effective way to enjoy fresh produce at home. Whether using a hydroponic system or planting in soil, this method is perfect for anyone looking to start a small home garden without much effort.
Start today and enjoy the satisfaction of growing your own crisp, organic celery right from your kitchen or balcony!