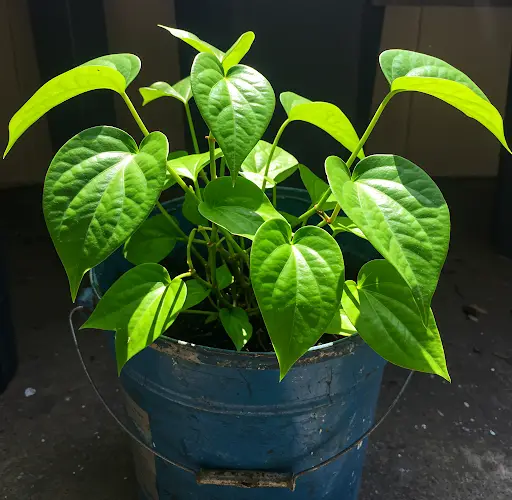
New Idea: Growing a Betel Leaf Plant in a Paint Bucket
Betel leaf, known for its shiny green heart-shaped leaves and medicinal benefits, is a popular plant across many cultures. Used in traditional medicine, religious rituals, and for chewing in combination with areca nut, betel leaf (Piper betle) is a fast-growing, evergreen creeper that thrives in warm, humid climates. If you’ve ever wanted to grow it at home, you don’t need a fancy pot or large garden. One clever, budget-friendly way is to grow it in a recycled paint bucket.
This simple DIY approach not only saves money but also gives a second life to used containers that might otherwise end up in the trash. Here’s a complete guide on how to grow a healthy betel leaf plant using a paint bucket.
Why Use a Paint Bucket?
Paint buckets are large, sturdy, and deep—perfect for supporting the root system of a vining plant like betel leaf. Most are made from durable plastic, which holds up well in outdoor conditions. With proper drainage and soil preparation, a paint bucket becomes an ideal container for growing leafy, moisture-loving plants like betel.
Materials You’ll Need:
-
A clean, empty 10 or 20-liter plastic paint bucket
-
A drill or sharp tool to make drainage holes
-
Pebbles or broken clay pieces (for drainage)
-
Potting mix or garden soil with compost
-
A healthy betel leaf cutting or seedling
-
A stick, trellis, or support frame
-
Water
-
Optional: paint or labels for decoration
Step 1: Prepare the Paint Bucket
First, make sure your paint bucket is thoroughly cleaned. Remove any traces of paint or chemicals by rinsing the bucket several times with water and letting it dry completely. If the bucket had strong-smelling paint, it’s best to soak it in a mild vinegar-water solution before use.
Once clean, use a drill or a heated nail to create 5–7 holes in the bottom for drainage. Good drainage is essential to prevent water from pooling and causing root rot. If you plan to keep the bucket indoors or on a balcony, place a tray underneath to catch any excess water.
Step 2: Prepare the Soil
Betel leaf plants love fertile, well-draining soil. A good mix includes:
-
50% garden soil
-
25% compost or well-rotted cow dung
-
25% sand or cocopeat for better drainage
You can also add neem cake powder or crushed eggshells to enrich the soil naturally. Fill the bucket about 3/4 full with this mix, pressing lightly to remove air pockets.
Before planting, place a few small stones or broken pots at the bottom of the bucket to further assist with drainage.
Step 3: Planting the Betel Leaf Cutting
The easiest way to grow betel leaf is from a stem cutting rather than seeds. Choose a healthy cutting with 3–4 nodes (small bumps where leaves grow). Remove the lower leaves and plant the cutting into the soil, burying at least one or two nodes.
Gently firm the soil around the stem and water it lightly. Place the bucket in a semi-shaded location with indirect sunlight—betel leaf plants do not do well in full sun, especially during hot afternoons.
Step 4: Support the Growing Vine
Betel leaf is a climbing vine, so it needs something to latch onto as it grows. Insert a wooden stick, bamboo pole, or mini trellis into the bucket to act as a climbing aid. Tie the young stem loosely with twine to guide its growth upward.
As it matures, the plant will grow long, trailing vines with lush green leaves. Regularly train the vine to follow the support structure for a neat, bushy look.
Step 5: Watering and Care
Water the plant regularly, keeping the soil moist but not soggy. Betel leaf prefers a humid environment, so in dry weather, mist the leaves with water once or twice a week.
You can feed the plant every 15–20 days with compost tea, banana peel water, or diluted cow dung slurry to promote lush, green growth. Avoid chemical fertilizers to keep your plant organic and safe for consumption.
Prune the plant occasionally to control its shape and encourage bushier growth. Remove any yellowing or dead leaves to maintain plant health.
Step 6: Harvesting
Once the plant is well established—usually after two to three months—you can begin harvesting. Pick the mature leaves from the lower part of the vine, leaving younger leaves intact. Regular harvesting encourages new leaf production.
To use, wash the leaves thoroughly. They can be used fresh in traditional wraps, Ayurvedic remedies, or even steeped in warm water as a herbal drink.
Extra Tips:
-
Keep the plant in partial shade for best results. Direct sunlight can scorch the leaves.
-
In cooler months, move the bucket indoors or cover it with a plastic sheet to maintain warmth.
-
If pests like aphids or mealybugs appear, spray neem oil mixed with water once a week as a natural remedy.
Conclusion
Growing a betel leaf plant in a recycled paint bucket is an innovative and eco-friendly gardening idea. It saves space, reduces waste, and offers a beautiful and useful plant for your home. Whether you’re growing it for culinary use, traditional purposes, or simply to green up your space, this method makes betel leaf cultivation accessible to everyone.
Give it a try—and you may soon find yourself sharing leaves with neighbors, friends, or even starting your own indoor vine garden.