Kale is a nutrient-rich leafy green that thrives in cooler temperatures and is a favorite among home gardeners for its resilience and high yield. If you’re short on gardening space or simply want a fun, eco-friendly way to multiply your kale plants, try propagating kale using plastic bottle planters. This method saves space, recycles plastic waste, and makes it easy to start seedlings for transplanting later.
This guide walks you through how to propagate kale from seeds using plastic bottles—perfect for balconies, patios, or even indoor setups with access to light.
Why Use Plastic Bottles for Kale Propagation?
Plastic bottles are an excellent option for starting kale seedlings because they:
-
Create a mini-greenhouse effect that helps seeds germinate faster.
-
Are transparent, allowing you to monitor root growth and moisture levels.
-
Are compact and easy to manage, especially in small spaces.
-
Promote sustainability by repurposing single-use plastics.
With just a few bottles and basic materials, you can grow strong kale seedlings ready for transplant into larger containers or garden beds.
What You’ll Need
To get started, gather the following materials:
-
1.5- or 2-liter plastic bottles (clear soda or water bottles work best)
-
Scissors or a utility knife
-
A heated nail or skewer (for poking drainage holes)
-
Seed-starting mix or light potting soil
-
Kale seeds
-
Spray bottle with water
-
Optional: cotton string or wick (for self-watering setup)
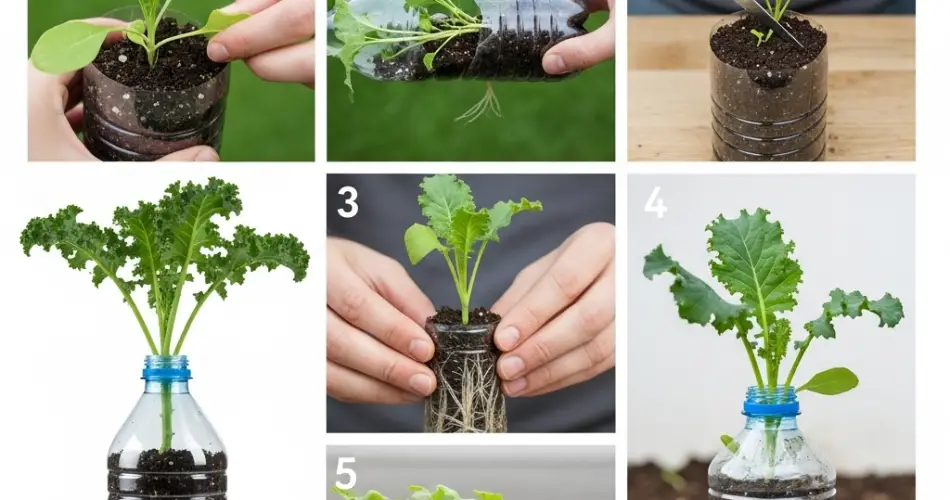
Step 1: Prepare the Bottles
Begin by thoroughly cleaning your bottles to remove any residue. Once clean and dry, use scissors or a cutter to slice each bottle in half or two-thirds of the way up. This will allow easy access to the bottom portion for planting.
Poke several small drainage holes in the base to prevent water accumulation. For a self-watering setup, you can insert a cotton wick through the bottle cap and rest the top portion (inverted) into the base filled with water. However, for basic propagation, the bottom half alone will do just fine.
Step 2: Add Soil
Fill the bottom portion of each bottle with about 3 inches of seed-starting mix or well-draining potting soil. Moisten the soil using a spray bottle to create a damp, but not soggy, environment. Kale seeds germinate best in moist, fluffy soil with good drainage.
If you’re mixing your own soil, try a blend of compost, cocopeat, and perlite or sand.
Step 3: Sow the Kale Seeds
Sow 2–3 kale seeds in each bottle about ¼ inch (0.6 cm) deep. Space them out evenly and lightly cover with soil. Gently press down to ensure good seed-to-soil contact, then mist the surface again with water.
You can label each bottle with the sowing date and kale variety for easy tracking.
Step 4: Create a Humid Environment
To help speed up germination, use the top half of the bottle as a dome cover. Simply place it over the base like a mini greenhouse. This helps retain warmth and moisture, ideal for sprouting seeds. Be sure to remove the cap to allow ventilation.
Place the bottle planters in a well-lit area, such as a balcony, porch, or sunny windowsill. Avoid direct midday sunlight as it can overheat the enclosed space.
Step 5: Germination and Care
Kale seeds usually germinate within 5–10 days. Once the seedlings emerge, remove the plastic dome during the day to improve airflow and prevent mold. Keep the soil consistently moist by spraying water as needed.
Rotate the bottles every day if they’re indoors, ensuring the seedlings grow upright and don’t lean toward the light.
Step 6: Thin the Seedlings
When the kale seedlings develop two or more true leaves, choose the strongest one in each bottle and snip the others at the base. This will give the remaining seedling more room and nutrients to grow.
Continue watering lightly and keep them in a bright spot until they are strong enough for transplanting.
Step 7: Transplanting to Bigger Containers or the Garden
Once your kale seedlings are about 4–5 inches tall and have developed a healthy root system, it’s time to move them to a larger growing space. This could be a deeper pot, a raised garden bed, or even a crate on your balcony.
To transplant:
-
Water the bottle planter well before transplanting.
-
Carefully loosen the soil around the seedling using a spoon or small tool.
-
Lift out the seedling gently, trying to preserve the roots.
-
Plant it into the new container, firm the soil, and water thoroughly.
Make sure your new planting site gets at least 4–6 hours of sunlight daily and has rich, well-drained soil.
Final Tips for Bottle-Grown Kale
-
Start multiple bottles at once for a continuous supply of seedlings.
-
Use organic fertilizer once seedlings are established to encourage healthy growth.
-
Keep bottles clean and check regularly for pests or fungus.
-
Kale grows best in cool weather—early spring and fall are ideal seasons to start.
Conclusion
Using plastic bottles to propagate kale seedlings is a clever, sustainable gardening hack that works beautifully for beginners and experienced growers alike. It saves money, space, and resources while giving you control over your food production from the very beginning.
Whether you’re planting in crates, containers, or garden beds later, starting your kale in bottles is an excellent first step toward a thriving homegrown harvest.


