Grow Asparagus Once and Eat It All Year Round with This Simple Tip – Anyone Can Do It!
Asparagus is one of the most rewarding vegetables to grow at home. Unlike other crops that require replanting every season, asparagus is a perennial vegetable, meaning you plant it once and enjoy fresh harvests for years to come. With the right care and a few simple techniques, you can establish a productive asparagus bed that provides delicious, homegrown spears throughout the year.
In this guide, we’ll cover everything you need to know about growing asparagus successfully, from choosing the right variety to ensuring high yields year after year.
Why Grow Asparagus at Home?
✔ Perennial Harvest: One planting can produce for 10-20 years. ✔ Delicious & Nutritious: High in fiber, vitamins A, C, and K, and packed with antioxidants. ✔ Low Maintenance: Once established, asparagus requires minimal care. ✔ Saves Money: Homegrown asparagus is fresher and more affordable than store-bought. ✔ Perfect for Beginners: Easy to grow with the right technique.
Step-by-Step Guide to Growing Asparagus
Step 1: Choosing the Right Asparagus Variety
Before you begin, it’s important to select the right variety for your garden.
✔ Mary Washington: A classic, disease-resistant variety with tender spears. ✔ Jersey Giant: High-yielding and cold-hardy. ✔ Purple Passion: A unique variety with sweeter, purple-colored spears. ✔ Apollo: Thrives in warmer climates and produces thick spears. ✔ UC 157: Ideal for hot climates with excellent disease resistance.
Step 2: Selecting the Right Growing Location
✔ Full Sun: Asparagus needs at least 6-8 hours of direct sunlight daily. ✔ Well-Drained Soil: Avoid soggy soil, as asparagus roots rot in excess water. ✔ Deep, Fertile Soil: A depth of 12-18 inches is ideal for root growth. ✔ Raised Beds: If you have heavy clay soil, raised beds improve drainage. ✔ Permanent Spot: Choose a location where the plant can grow undisturbed for years.
Step 3: Preparing the Soil for Asparagus
✔ Loosen Soil: Dig 12-18 inches deep to provide space for root development. ✔ Add Organic Matter: Mix in aged compost, manure, or peat moss to enrich the soil. ✔ Check pH Level: Ideal soil pH is 6.5-7.5 (slightly acidic to neutral). ✔ Mix in Bone Meal: Provides phosphorus, which promotes strong root growth. ✔ Improve Drainage: If soil is compacted, add sand or perlite.
Step 4: Planting Asparagus Crowns or Seeds
✔ Using Crowns (Recommended for Faster Harvests):
- Dig trenches 8-10 inches deep and 12-18 inches apart.
- Place crowns with roots spread out and buds facing upward.
- Cover with 2 inches of soil and water thoroughly.
- As plants grow, gradually fill in the trench with soil until level.
✔ Using Seeds (Takes 2-3 Years to Mature):
- Soak seeds for 24 hours before planting.
- Plant ½ inch deep in seed trays or directly in the garden.
- Transplant seedlings when they reach 10-12 inches in height.
Step 5: Caring for Your Asparagus Plants
✔ Watering: Keep soil moist but not waterlogged. Water 1-2 times a week. ✔ Mulching: Apply straw, leaves, or grass clippings to retain moisture and prevent weeds. ✔ Fertilizing: Feed with a balanced fertilizer (10-10-10) in early spring and after harvest. ✔ Weed Control: Keep the bed weed-free as asparagus roots don’t compete well. ✔ Support Growth: Use light staking if plants become tall and fall over.
Step 6: The Secret to Growing Asparagus Year-Round
✔ Harvesting Mature Plants:
- Wait until the third year to start harvesting spears.
- Cut spears when they are 6-8 inches tall.
- Use a sharp knife to cut just above the soil level.
✔ Extend the Harvest with Succession Planting:
- Plant different varieties that grow at different times.
- Use cold frames or row covers to extend the season in colder months.
- In warm climates, provide afternoon shade to reduce summer stress.
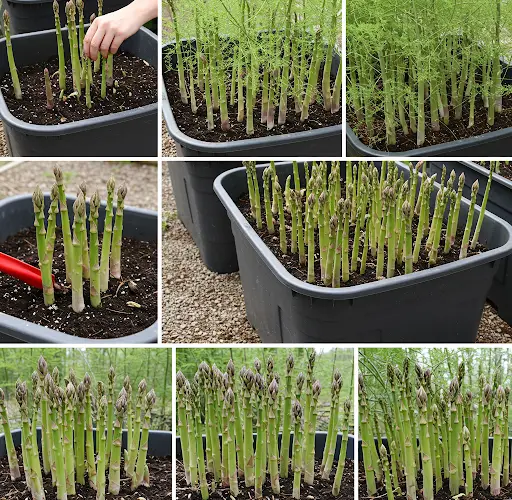
✔ Regrow Asparagus Indoors in Containers:
- Use deep pots (at least 12 inches) filled with rich potting mix.
- Place in a sunny window or under grow lights.
- Harvest small batches throughout the year!
✔ Dividing Mature Crowns:
- Every 4-5 years, divide large asparagus crowns to create new plants.
- Replant in a different area to continue harvesting indefinitely.
Common Problems and How to Fix Them
✔ Yellowing Leaves: Indicates overwatering or poor drainage. Improve soil aeration. ✔ Thin, Weak Spears: Could be nutrient deficiency. Apply organic compost or balanced fertilizer. ✔ Pest Issues:
- Asparagus Beetles: Hand-pick or use neem oil.
- Slugs & Snails: Sprinkle crushed eggshells around plants. ✔ Fungal Diseases: Ensure proper spacing for good airflow.
Harvesting and Storing Asparagus
✔ Harvesting Time:
- First year: Don’t harvest; let plants establish.
- Second year: Light harvest (cut only a few spears).
- Third year & beyond: Full harvest (cut spears for 6-8 weeks). ✔ Storing Asparagus:
- Wrap in a damp cloth and store in the fridge for up to a week.
- Blanch and freeze for long-term storage. ✔ Preserving:
- Pickle spears for a delicious year-round snack.
- Dehydrate for homemade asparagus powder (great for soups!).
Final Thoughts
Growing asparagus at home is an excellent investment for any gardener. With minimal effort, you can enjoy fresh, nutritious spears year after year. By choosing the right variety, preparing the soil correctly, and following key maintenance tips, you can establish a thriving asparagus bed that produces delicious harvests with little ongoing work.
So why wait? Start your asparagus garden today and enjoy homegrown spears for decades!
Happy Gardening!