Garlic is a staple in kitchens around the world, offering both culinary flavor and medicinal benefits. But did you know you can grow it at home even if you don’t have a traditional garden? Using repurposed plastic bottles, garlic can be propagated easily in small urban spaces like balconies, windowsills, or patios. This DIY method is cost-effective, environmentally friendly, and highly practical for beginner gardeners or anyone short on space.
Here’s a step-by-step guide on how to propagate garlic cloves in plastic bottles to enjoy a fresh, homegrown supply.
Why Propagate Garlic in Bottles?
Plastic bottles are excellent containers for small-scale gardening. They allow gardeners to monitor moisture and root development while also maximizing space vertically. Garlic is particularly well-suited to this method since it grows well in confined spaces with proper drainage and light.
Benefits include:
-
Minimal space required
-
Low cost using recycled materials
-
Portability and ease of relocation
-
Efficient drainage and moisture control
Materials You’ll Need
Before you begin, gather the following materials:
-
1.5 or 2-liter plastic bottles (clear soda or water bottles)
-
A sharp knife or cutter
-
Heated nail or skewer (for drainage holes)
-
High-quality garlic cloves (organic or untreated)
-
Potting mix or loose garden soil
-
Water spray bottle
-
Optional: labels or permanent marker
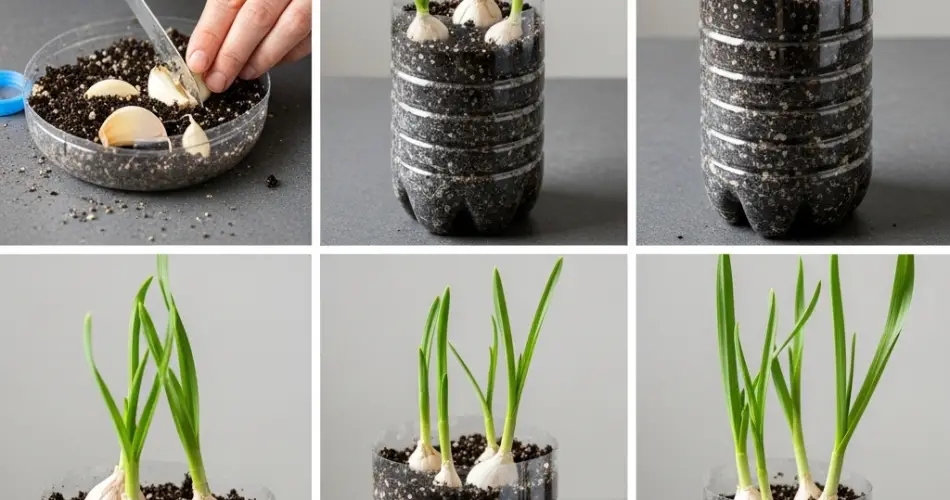
Step 1: Prepare the Bottles
Start by thoroughly cleaning and drying your bottles. Remove any labels so light can pass through the sides. Using a cutter, make a horizontal cut around two-thirds up the bottle to create a top and bottom section.
Use a heated nail or pointed tool to poke several drainage holes at the base of the bottom section. This ensures excess water won’t accumulate and cause rot. If you plan to stack or hang the bottles, you can also add side holes for mounting or threading wire through.
Step 2: Choose and Prepare Garlic Cloves
Select large, firm cloves from a healthy garlic bulb. Avoid using shriveled, damaged, or moldy cloves. It’s best to choose organic garlic, as supermarket varieties are sometimes treated to prevent sprouting.
Do not peel the cloves; simply separate them gently. If you notice green shoots already forming, even better—those cloves are already on their way to sprouting.
Step 3: Add Soil to the Bottles
Fill the bottom section of each bottle with loose, well-draining soil. A mix of compost, garden loam, and sand or perlite works well. Pre-moisten the soil slightly so it’s damp but not soggy.
Make a small hole in the center of the soil with your finger or a stick. Insert a garlic clove with the pointed side up and the root end down. The top of the clove should be just beneath the soil surface—no more than 1 inch (2.5 cm) deep.
If you want to propagate multiple cloves in a single bottle, space them at least 2 inches (5 cm) apart.
Step 4: Provide the Right Conditions
Garlic thrives in full sun and cooler temperatures during the initial growth period. Place the bottles in a sunny location—ideally where they receive at least 6 hours of sunlight daily. A south-facing balcony or windowsill is ideal.
Water the soil lightly using a spray bottle whenever the top inch feels dry. Avoid overwatering, which can cause the cloves to rot. Bottles tend to dry out faster than traditional pots, so check moisture levels regularly.
Step 5: Watch for Sprouting
In about 1–2 weeks, green shoots should begin to emerge from the soil. These shoots will continue to grow upward, forming sturdy stalks that resemble scallions.
At this point, remove any makeshift covers or bottle tops, if you’ve used them. Good airflow will help the plants grow strong and reduce the risk of fungal disease.
If you used multiple cloves per bottle, you can thin the weaker ones and allow only the strongest shoots to remain, ensuring better development.
Step 6: Maintain Growth
Garlic is a slow-growing crop that takes several months to mature. Continue watering consistently and ensure the plants get enough sunlight. You can feed the plants with a diluted organic liquid fertilizer once every two weeks to encourage healthy foliage and root development.
Trim any yellowing leaves, and keep the bottles in an upright position so the shoots grow straight.
Step 7: Harvest Time
Depending on the garlic variety and your climate, bulbs can take 5–8 months to mature. You’ll know it’s time to harvest when the lower leaves start to yellow and dry out.
To harvest, gently remove the soil around the base of the plant and pull it out by the stalk. Brush off excess soil and allow the garlic to cure in a dry, well-ventilated place for two weeks before storing.
Alternatively, if you planted the garlic for its greens (garlic shoots or scapes), you can snip off the top leaves regularly once they reach 6–8 inches in height.
Final Tips
-
Rotate bottles regularly to ensure even sun exposure.
-
Use rainwater or filtered water for best results.
-
Repurpose the same bottles for successive planting rounds.
-
Label your bottles with planting dates for tracking.
Conclusion
Growing garlic in plastic bottles is a sustainable and rewarding way to garden in small spaces. With a few simple tools and a bit of patience, you can propagate fresh garlic right from your balcony, windowsill, or patio. Not only will you enjoy homegrown flavor, but you’ll also reduce waste and bring greenery into your everyday surroundings.
Whether you’re growing for bulbs or garlic greens, this compact method proves that you don’t need a backyard to enjoy fresh, flavorful produce.


