Thyme is a versatile culinary herb loved for its aromatic, earthy notes that elevate everything from roasted meats to soups, stews, and bread. It’s also valued as a medicinal plant, traditionally used for its antibacterial and soothing properties. While thyme is readily available at grocery stores, growing it at home provides fresh sprigs whenever you need them, plus the satisfaction of cultivating your own herbs. And the best part? You don’t need a garden or expensive planters—just a healthy thyme cutting and a recycled plastic bottle. This method of propagation is simple, eco-friendly, and perfect for anyone looking to enjoy homegrown herbs in small spaces.
Why Use Recycled Bottles for Propagation?
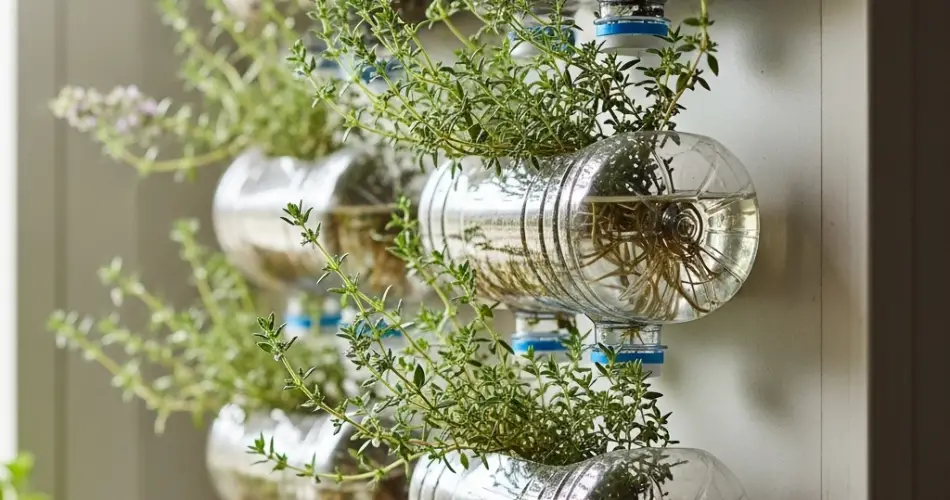
Propagating thyme in recycled bottles offers several advantages:
-
Eco-friendly: Reusing bottles helps reduce plastic waste.
-
Budget-friendly: You don’t need to buy pots or special containers.
-
Beginner-friendly: Clear bottles make it easy to monitor root growth.
-
Space-saving: Bottles fit easily on windowsills, balconies, or countertops.
Unlike growing from seed, which can be slow and unpredictable, propagating thyme from cuttings ensures you’ll have strong, true-to-type plants with the same flavor and characteristics as the parent.
Choosing and Preparing Thyme Cuttings
To begin, select a healthy thyme plant as your source. Look for stems that are free of pests and diseases, with vibrant green leaves and strong growth.
Steps to prepare your cuttings:
-
Using clean scissors or pruning shears, cut a stem that is about 4–6 inches long.
-
Choose a semi-soft stem—not too woody and not too young. This middle stage roots best.
-
Trim the cutting just below a leaf node (where the leaves join the stem).
-
Remove the leaves from the bottom two inches of the stem, leaving only a few pairs of leaves at the top.
Optionally, dip the cut end into a natural rooting aid like aloe vera gel, honey, or cinnamon. While not required, these natural boosters can help speed up root formation and prevent rot.
Preparing the Bottle
A standard 500 ml or 1-liter bottle works well. Here’s how to set it up:
-
Clean the bottle thoroughly to remove any residue.
-
Cut off the top portion to create a wider opening for inserting cuttings.
-
Fill the bottle halfway with clean, room-temperature water.
-
Place the thyme cutting into the bottle, ensuring at least one leaf node is submerged while the upper leaves remain above water.
Set the bottle in a bright spot with indirect sunlight. Too much direct sun can overheat the water and damage the cutting.
Rooting Process
Thyme cuttings usually take between 10–20 days to develop visible roots. During this period, your main task is keeping the water fresh.
-
Change the water every 2–3 days to provide oxygen and prevent bacterial buildup.
-
Monitor the submerged nodes—small white roots should begin to appear.
-
Avoid placing too many cuttings in one bottle, as overcrowding can slow root growth.
Once roots reach about one inch long, your thyme cutting is ready to move into soil.
Transplanting Thyme into Soil
Although thyme can survive in water for a while, it thrives best when transplanted into soil, where it can establish a stronger root system.
-
Choose a pot with good drainage holes.
-
Fill it with a well-draining soil mix—combine regular potting soil with sand or perlite to prevent excess moisture.
-
Make a small hole in the soil and gently place the rooted cutting inside.
-
Cover the roots with soil, press lightly, and water thoroughly.
Place the pot in a sunny location, as thyme needs at least 6 hours of sunlight daily to flourish.
Caring for Thyme Plants
Thyme is a hardy, low-maintenance herb, which makes it ideal for beginners. With just a little attention, your new plant will thrive.
-
Watering: Allow the soil to dry slightly between waterings. Thyme prefers drier conditions, so avoid overwatering.
-
Pruning: Regularly trim the plant to encourage bushier growth. Snipping off the tips not only promotes new shoots but also provides you with fresh thyme for cooking.
-
Feeding: Thyme doesn’t require heavy feeding. A monthly application of diluted liquid fertilizer or compost tea during the growing season is sufficient.
Harvesting Fresh Thyme
In a few weeks, your propagated thyme will grow strong enough for harvesting. Cut sprigs as needed, but avoid taking more than one-third of the plant at once to keep it healthy.
Fresh thyme is best used immediately in cooking, but it can also be dried for long-term storage. Simply bundle a few sprigs together and hang them upside down in a cool, dry place. Once fully dried, strip the leaves from the stems and store them in airtight containers.
Final Thoughts
Propagating thyme in recycled bottles is an easy, sustainable, and rewarding way to grow your own herbs. By reusing materials you already have, you reduce waste while cultivating a steady supply of this flavorful plant. From cutting to soil, the process requires minimal effort yet delivers lasting benefits. Whether you’re new to gardening or simply looking for a low-cost method to expand your herb collection, bottle propagation is the perfect solution.
With just a cutting, a bottle, and a little patience, you can enjoy fresh thyme at your fingertips—ready to flavor your meals and brighten your kitchen garden.


