Thyme is a versatile and fragrant herb cherished in kitchens around the world. It adds depth and aroma to roasted meats, stews, sauces, and even simple vegetable dishes. Beyond its culinary uses, thyme is valued for its resilience and ability to thrive with minimal care, making it a favorite among gardeners. One of the easiest and most sustainable ways to expand your thyme collection is through propagation—multiplying plants from cuttings instead of starting from seeds. Even better, you can do this using recycled plastic bottles, turning waste into a useful tool for eco-friendly gardening.
This method creates a mini-greenhouse environment for thyme cuttings, providing the warmth and humidity they need to develop strong roots. It is inexpensive, beginner-friendly, and an excellent way to give old bottles a second life while growing more of your favorite herb.
Why Choose Plastic Bottles for Propagation?
Plastic bottles are often thrown away after a single use, but they can be repurposed effectively in gardening. When cut and reused, bottles serve as small propagation chambers that:
-
Maintain humidity: The enclosed bottle traps moisture, preventing cuttings from drying out.
-
Provide visibility: Clear plastic allows you to observe root growth and soil condition.
-
Cost nothing: Bottles are readily available and free to repurpose.
-
Encourage sustainability: By recycling, you reduce waste and support eco-friendly gardening practices.
This practical approach turns something disposable into a valuable tool for multiplying herbs.
Materials You’ll Need
Gather the following simple items before you begin:
-
A healthy thyme plant
-
Clear plastic bottles (500 ml or 1 liter sizes work best)
-
Scissors or a sharp craft knife
-
Fresh water or a lightweight potting mix with sand or perlite
-
Pruning shears or sharp scissors for cutting stems
-
Optional: cling film or rubber bands for extra humidity control
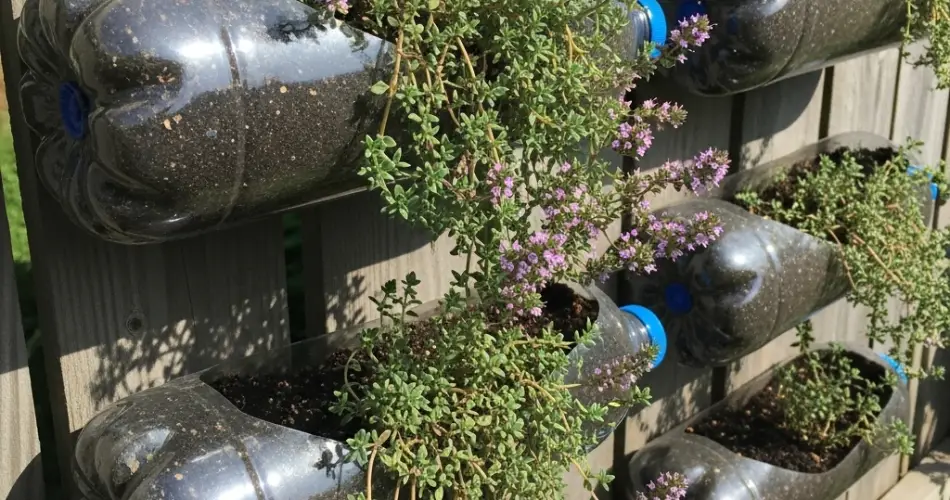
Step 1: Preparing the Bottle
Wash the bottle thoroughly to remove any residue. Cut it in half using scissors or a knife. The bottom half will hold either water or soil for the cuttings, while the top half can act as a humidity dome.
-
Water method: Fill the bottom part with enough water to submerge the stem nodes without covering the leaves.
-
Soil method: Fill the base with a well-draining potting mix. A blend with sand or perlite works best for thyme since it prevents waterlogging.
Step 2: Taking Thyme Cuttings
Select fresh, green, and non-flowering stems from your thyme plant. Cut 4–5 inch segments just below a leaf node. Remove the leaves from the lower part of the stem, leaving only a few leaves at the top. This ensures the energy goes toward root formation instead of supporting excess foliage.
Step 3: Planting the Cuttings in the Bottle
Place the thyme cuttings into your prepared bottle setup:
-
In the water method, ensure the leaf nodes are submerged while keeping the leaves above water.
-
In the soil method, insert the stems about an inch deep into the moist potting mix and gently firm the soil around them. Cover the cuttings with the upper part of the bottle or cling film to create a greenhouse-like environment.
This enclosed setup helps retain humidity and warmth, giving the cuttings the best chance to root successfully.
Step 4: Placement and Care
Position the bottle nursery in a bright location with indirect sunlight. A kitchen windowsill or balcony ledge works perfectly. Direct sunlight can cause overheating inside the bottle, which may harm the cuttings.
-
For the water method, refresh the water every few days to prevent stagnation.
-
For the soil method, check the moisture regularly and mist lightly if the soil starts to dry out. Avoid overwatering, as thyme prefers drier conditions.
Step 5: Monitoring Root Growth
After about 10–14 days, you should start noticing changes:
-
In the water method, roots will begin forming at the nodes, visible through the clear bottle.
-
In the soil method, signs of growth usually appear as new leaves sprouting from the cutting.
Once roots reach 2 inches in length or the cutting shows steady new growth, it is ready for transplanting.
Step 6: Transplanting Your New Thyme Plants
Transfer the rooted cuttings into pots with good drainage or directly into your garden. Thyme thrives in well-drained soil and full sunlight. If planting in containers, choose pots with holes at the bottom to prevent excess water buildup.
Water the young thyme plants lightly after transplanting to help them settle, then gradually shift to a less frequent watering schedule, mimicking the herb’s natural preference for drier soil.
Caring for Mature Thyme Plants
To keep your thyme plants thriving:
-
Water sparingly: Allow the soil to dry between waterings.
-
Prune often: Regular trimming encourages bushy growth and prevents stems from becoming too woody.
-
Harvest frequently: Snip leaves regularly for cooking; this stimulates more growth.
-
Fertilize lightly: Use a diluted organic fertilizer once a month during the growing season.
Final Thoughts
Propagating thyme in plastic bottles is a simple, eco-friendly way to expand your herb collection. Not only do you gain more plants without buying seeds or new pots, but you also reduce plastic waste by giving bottles a meaningful second life.
This method blends sustainability with practicality, making it a rewarding project for anyone who loves gardening. With just a few steps, you can enjoy an endless supply of fresh thyme for your kitchen, while also doing your part for the environment.


