A Natural and Effective Method for Growing Avocado Trees from Shoot Cuttings
Avocados are not only prized for their rich, creamy fruits, but also for their versatility and ability to thrive in various growing conditions. While growing avocados from seeds is a popular method, it often takes several years to produce fruit and can result in genetic variability. For faster, more reliable results, many gardeners turn to propagation from shoot cuttings.
This method allows you to clone an existing, healthy avocado tree, ensuring consistent fruit quality and growth characteristics. Using all-natural materials like garlic and tomato, you can create a healthy environment that stimulates root development and helps your new plant get off to a strong start.
Here’s a comprehensive, step-by-step guide to propagating avocado trees from shoot cuttings using simple, accessible ingredients and growing media.
Step 1: Selecting the Right Shoot
Start by selecting a young, healthy shoot from a mature avocado tree. Ideally, the shoot should be semi-soft, green, and flexible, not woody or brittle. Cut a section that is about 6 to 8 inches (15–20 cm) long, making sure it includes at least one node — the bump on the stem where leaves and roots form.
Once you’ve cut the shoot, remove most of the leaves, leaving only one or two at the top. This reduces water loss through transpiration and helps the cutting focus its energy on growing roots.
Step 2: Treating the Cutting with Garlic
Garlic serves as a natural antibacterial agent and plays a crucial role in preventing bacterial infections, which are common in the early stages of plant propagation. The natural compounds in garlic, especially allicin, help to disinfect the cutting and reduce the risk of rot.
To prepare the garlic treatment, crush a clove or two of fresh garlic to release its juice. Rub the garlic juice generously on the lower portion of the avocado shoot, especially the cut end. This creates a protective barrier that helps ward off harmful microorganisms and sets the stage for healthy root development.
Step 3: Using Tomatoes to Stimulate Root Growth
Tomatoes might not be the first ingredient that comes to mind when thinking of plant propagation, but they can be surprisingly effective. The pulp of tomatoes contains enzymes and hormones that promote root formation.
To use tomatoes in this process, cut a ripe tomato in half and remove all the seeds. Apply the tomato pulp directly to the base of the avocado shoot. Allow the pulp to coat the bottom portion of the stem — this will act as a natural rooting stimulant and may significantly speed up root growth.
Step 4: Choosing the Right Growing Medium – Sand
Sand is one of the most effective media for propagating avocado cuttings. It provides excellent drainage and aeration, which are essential for root health. Unlike potting soil, sand prevents water from pooling around the base of the cutting, reducing the risk of root rot.
Fill a container with clean, coarse sand. Moisten the sand slightly, but ensure it is not overly wet. Insert the treated avocado cutting about halfway into the sand, making sure it stands upright and remains stable.
Step 5: Providing the Right Environment
After planting the cutting in sand, place the container in a shaded area with indirect light. A cool, humid environment is ideal for root development. Too much direct sunlight at this stage can dry out the cutting or cause heat stress.
Water the cutting at least twice a day to keep the sand moist. However, avoid overwatering, as excessive moisture can lead to fungal problems or suffocate the developing roots.
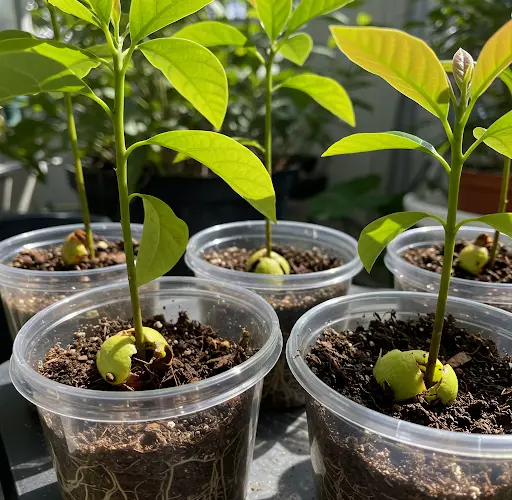
Step 6: Monitoring Growth Over Time
After approximately 18 days, begin checking the cutting for signs of progress. Gently tug on the shoot to feel for resistance — if it holds firm, it’s likely that roots are forming. You may also see signs of new growth or shoots emerging from the top of the cutting.
At the 18-day mark, if you carefully remove the cutting from the sand, you should see that the roots have begun to spread out. This is an excellent indicator that the propagation process is working successfully.
Step 7: Transplanting the Rooted Cutting
Once the roots are well developed and approximately 1 to 2 inches long (2.5 to 5 cm), the cutting is ready to be transplanted into nutrient-rich potting soil. Choose a container with good drainage holes and fill it with a mix of garden soil, compost, and sand for optimal root health.
Plant the rooted cutting carefully, ensuring that the roots are not damaged during the transfer. Water the new plant thoroughly and place it in a partially shaded spot for the first few days as it acclimates to its new environment. Gradually introduce it to more sunlight as it begins to grow stronger.
Final Thoughts
Propagating avocado trees from shoot cuttings is an efficient, natural, and rewarding method that can yield impressive results in just a few weeks. By using common household ingredients like garlic and tomato — combined with a simple sand planting medium — even beginner gardeners can successfully grow new avocado trees at home.
This method not only saves money but also allows you to replicate healthy, productive avocado trees that are already adapted to your local climate. With a little patience, care, and consistency, you’ll soon have strong, vibrant avocado saplings ready to grow into fruit-bearing trees.
This natural propagation method offers a reliable path to growing avocados efficiently — ideal for anyone passionate about home gardening or sustainable plant cultivation.


