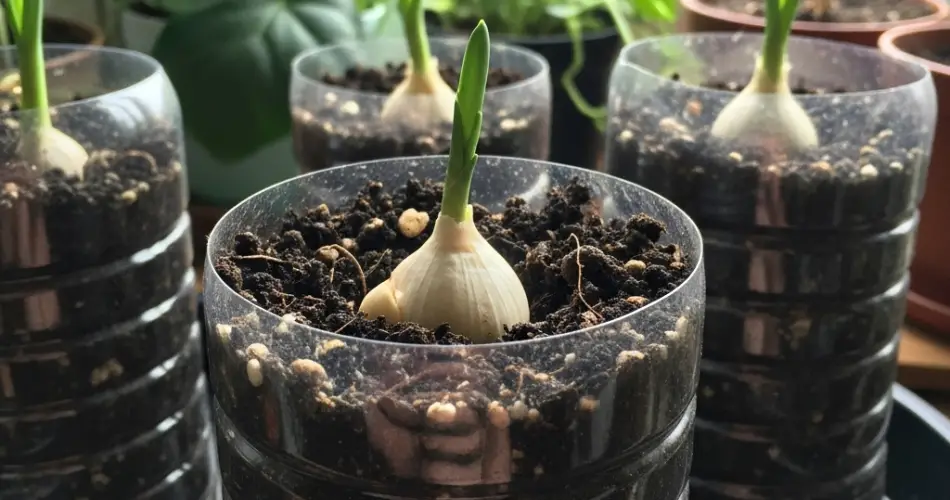
Growing garlic at home doesn’t require a sprawling garden or expensive containers. In fact, you can start your garlic journey using simple recycled plastic bottles. These bottle pots are ideal for urban gardeners or anyone short on space. Garlic is surprisingly low-maintenance and thrives in a compact setup if given the right soil, light, and moisture.
This guide will walk you through how to use plastic bottles to plant garlic easily, from setup to harvest. It’s an eco-friendly, affordable solution perfect for balconies, windowsills, or any sunny spot.
Why Use Plastic Bottles for Garlic?
Plastic bottles are lightweight, easy to modify, and often readily available. When cut and arranged properly, they serve as efficient mini-planters with good drainage. Garlic roots don’t grow particularly deep, which makes them well-suited for these compact containers.
By reusing plastic bottles, you also reduce waste and contribute to sustainable gardening—without compromising on plant health or yield.
What You Need
To get started, gather the following materials:
-
Clean, empty plastic bottles (1.5L to 2L size works best)
-
A sharp cutter or scissors
-
Nail or skewer for making drainage holes
-
Potting soil (rich and well-draining)
-
A handful of compost or aged manure
-
Garlic cloves (organic, untreated for better sprouting)
-
Watering can or spray bottle
Optional but helpful:
-
Marker for labeling
-
String or wire for hanging bottles
Preparing the Garlic for Planting
Choose garlic cloves that are firm and healthy. Avoid any with soft spots, mold, or damage. Separate the bulb into individual cloves, but don’t remove the papery skin. The larger the clove, the bigger the bulb it can potentially produce.
You can soak the cloves in water for a few hours or overnight to jumpstart root development, especially if your area has a hot climate.
Making the Bottle Pots
-
Cut the Bottle
Slice the plastic bottle in half or cut a window along one side. If you plan to hang it, keep the top intact and punch two holes near the neck for tying string or wire. -
Add Drainage Holes
Use a nail or skewer to make 4–5 holes at the bottom for proper drainage. Poor drainage can cause rot, especially in garlic. -
Prepare the Soil
Mix potting soil with a handful of compost or aged manure. Garlic prefers loose, nutrient-rich soil. Fill the bottle planter about three-quarters full.
Planting Garlic in Bottles
-
Plant the Clove
Insert each garlic clove pointed side up, about 2–3 inches deep. If using a larger bottle, you can fit two or three cloves, spaced a few inches apart. -
Water Lightly
After planting, water the soil until moist but not soggy. Use a spray bottle or small watering can to avoid displacing the cloves. -
Choose a Sunny Spot
Garlic loves sunlight—place your bottle pots where they’ll receive at least 6 hours of direct light each day. A windowsill, balcony, or rooftop are all great options.
Caring for Garlic in Bottles
-
Watering: Water every few days or when the top inch of soil feels dry. Do not overwater—bottle planters can become waterlogged if drainage is poor.
-
Feeding: Add a liquid fertilizer like compost tea or diluted fish emulsion once every two weeks for stronger bulb development.
-
Mulching (Optional): A light mulch layer of shredded leaves or straw helps retain moisture and suppress weeds.
Growth Timeline
-
First 2–4 Weeks: Green shoots will emerge. These are garlic “scapes” or leaves and indicate healthy root development.
-
2–3 Months In: Leaves grow taller and stronger. You can harvest some greens for cooking, but avoid over-trimming.
-
3–5 Months In: The lower leaves begin to yellow and dry—this signals the bulbs are almost mature.
Harvesting Your Garlic
Garlic is ready to harvest when the lower leaves have dried and the upper leaves begin to wilt, typically 4–6 months after planting. To harvest:
-
Gently remove the garlic from the bottle without damaging the bulb.
-
Brush off excess soil, but don’t wash.
-
Let the bulbs cure by hanging them in a dry, airy spot out of direct sunlight for 1–2 weeks.
-
Once cured, trim the roots and tops and store your garlic in a cool, dry place.
Bonus Tip: Regrow Garlic Greens
Even if you don’t want to wait months for a full bulb, garlic greens grow quickly and can be harvested within 3–4 weeks. Simply plant cloves closer together in a shallow bottle pot and trim the green shoots as needed for stir-fries, soups, or salads.
Final Thoughts
Growing garlic in plastic bottle pots is a practical, sustainable, and rewarding way to enjoy homegrown flavor even in tight urban spaces. With a few simple tools and a bit of patience, you can start your own garlic garden using just bottles and soil. Whether you’re after full bulbs or fresh greens, this method puts fresh garlic right within reach—no backyard required.


