Plastic bottles are everywhere. While they’re often tossed into the recycling bin (or worse, into the trash), these everyday items can be given a second life—one that benefits both your plants and the environment. With just a few simple steps, plastic bottles can be transformed into practical and effective drip irrigation systems that keep your garden hydrated without waste or expense.
This article will show you how to repurpose plastic bottles into slow-drip watering devices perfect for houseplants, garden beds, or even balcony containers. Not only will you reduce plastic waste, but you’ll also save water and time.
Why Use Drip Irrigation?
Drip irrigation delivers water directly to the base of plants at a slow, steady rate. This method conserves water by minimizing evaporation and runoff, making it ideal for dry climates, busy gardeners, or anyone looking to optimize watering routines.
Plastic bottle drippers work particularly well because they:
-
Deliver consistent moisture right where it’s needed
-
Help reduce weed growth by avoiding water spread
-
Minimize overwatering and root rot
-
Can be made for free using household waste
What You’ll Need
To make your own bottle dripper, you don’t need any special tools or equipment. Just gather a few basics:
-
Clean plastic bottles (500 ml to 2 liters, depending on the plant size)
-
A needle, pin, nail, or sharp knife
-
Optional: string, small stones, or a skewer
These homemade drippers can be used in gardens, raised beds, or potted plants—indoors and outdoors.
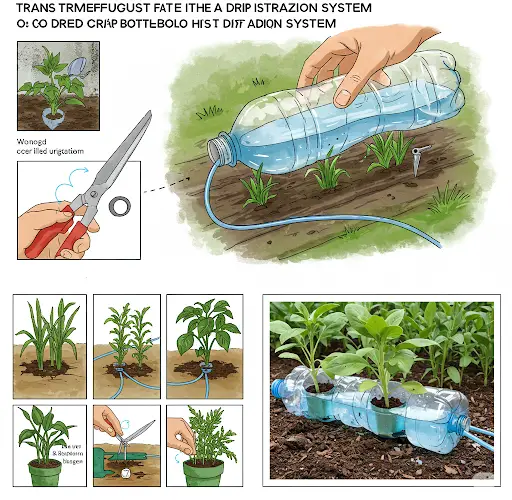
Method 1: Classic Bottle Dripper for Pots or Garden Beds
Step 1: Prepare the Bottle
Remove any labels from the bottle and rinse it thoroughly. Use a heated needle, nail, or pin to pierce 2–4 small holes near the cap. These will release water slowly into the soil.
Step 2: Fill and Seal
Fill the bottle with water. Screw the cap on tightly (if it has holes in it), or leave it slightly loose to control the drip rate.
Step 3: Install
Turn the bottle upside down and push the neck into the soil near the base of the plant. Make sure it’s stable and the holes are buried. Water will begin to drip gradually into the root zone.
Method 2: Side Drip for Raised Beds and Rows
Step 1: Puncture the Bottle
Lay a larger bottle (1.5–2 liters) on its side and poke 3–5 small holes along one side using a needle or hot nail.
Step 2: Add Water and Position
Place the bottle next to the plant row with the holes facing downward. Fill the bottle with water and loosely screw on the cap.
Step 3: Cover (Optional)
To reduce evaporation and algae growth, cover the bottle with mulch or soil. This method is excellent for rows of vegetables or herbs.
Method 3: Hanging Drip Bottle for Balcony Plants
If you have hanging plants or vertical garden setups, this version works well.
Step 1: Make a Hanging Hole
Take a small bottle (500 ml to 1 liter), and poke a tiny hole in the cap. Tie a string or wire around the neck so you can hang it.
Step 2: Suspend and Adjust
Hang the bottle upside down over the plant. You can control the drip speed by adjusting the cap tightness or the size of the hole.
Tips for Success
-
Test the drip rate before leaving the system unattended. Water should release slowly over 1–3 days, not all at once.
-
Use filtered or clean water to prevent clogs, especially with very small holes.
-
Add small pebbles to the bottle to slow down flow or act as a simple filter.
-
Keep bottles shaded or buried to prevent algae growth in clear plastic.
Additional Uses for Bottle Drippers
-
Fertilizer feeders: Add diluted liquid fertilizer to the bottle for slow nutrient delivery.
-
Vacation watering: Keep your plants hydrated while you’re away with multiple bottle drippers installed.
-
Seedling care: Use small bottles to gently water seedlings without dislodging soil.
Conclusion
Instead of throwing away plastic bottles, turn them into eco-friendly drip irrigation systems that provide consistent, efficient watering for your plants. These DIY drippers are easy to make, cost nothing, and help reduce plastic waste while supporting healthy root systems.
With just a few bottles and some creativity, you can improve your garden’s hydration while doing your part for the environment. It’s a simple idea that brings big benefits—both for your plants and the planet.


