How to Plant and Care for Pepper Plants for a Strong and Productive Harvest
Planting pepper plants correctly is crucial to ensuring they grow strong, healthy, and yield a great number of fruits. By properly preparing the soil and using natural fertilizers, you can boost their growth and maximize your harvest. Here’s the best method to give your pepper plants the perfect start in the garden.
Step 1: Preparing the Raised Garden Bed
The first step in planting pepper plants is to prepare the raised garden bed to ensure the soil is rich in nutrients. Begin by cleaning the bed thoroughly. Remove any old vegetables, weeds, and unwanted plants. If some vegetables are still good, you can set them aside for use, but any overripe, spoiled, or damaged produce should be chopped into small pieces along with any removed leaves. This process helps clear the space for the new plants and removes potential pests or diseases.
Step 2: Digging a Trench
Once the garden bed is cleared, the next step is to dig a trench long enough to accommodate all the organic material you plan to add. The trench should be deep enough to bury the chopped vegetables, leaves, and kitchen waste completely. If the bed is smaller, smaller holes can be dug instead, but for larger beds, a trench is preferable because it allows for even distribution of the nutrients across the soil.
Step 3: Adding Organic Material
Place all the chopped vegetable scraps, leaves, and kitchen waste into the trench. These organic materials are rich in valuable nutrients that will help improve the soil as they break down. As decomposition starts, beneficial microbes multiply, breaking down the waste and making nutrients more available to the plants.
Step 4: Adding Vermicompost
To further enhance the decomposition process, add a layer of vermicompost on top of the organic material. Vermicompost is made by earthworms and is one of the best natural fertilizers available. It’s packed with beneficial microorganisms, enzymes, and nutrients that enrich the soil and support plant health. This step helps create an environment that promotes healthy plant growth by ensuring an ample supply of nutrients.
Step 5: Sprinkling Mustard Cake Fertilizer
Next, sprinkle a thin layer of mustard cake fertilizer over the vermicompost. Mustard cake is a natural fertilizer made from mustard seeds after oil extraction, and it is rich in important nutrients such as nitrogen, phosphorus, and potassium. Nitrogen promotes lush green foliage, phosphorus encourages strong root development, and potassium helps improve plant health and disease resistance.
Step 6: Covering and Watering the Trench
After adding the organic material and fertilizers, cover the trench with the soil that was removed earlier. This step is necessary to trap moisture, prevent unpleasant smells, and protect the beneficial microbes and earthworms beneath the soil. After covering the trench, water the bed generously. Watering is essential to activate microbial activity and speed up the decomposition process of the buried organic matter.
Step 7: Adding Compost or Well-Rotted Manure
After a few days, once the materials have started breaking down, add a layer of compost or well-rotted manure on top of the soil. This additional layer further improves soil fertility by providing essential minerals and enhancing soil structure. Compost and manure help the soil retain moisture and provide a continual source of nutrients, keeping the soil active and rich with beneficial microbes.
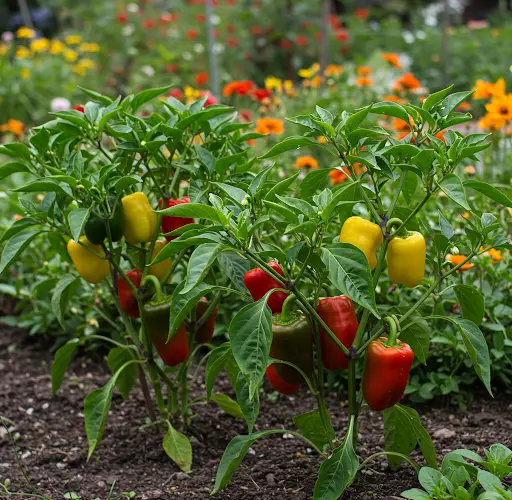
Step 8: Planting the Pepper Plants
Now that the soil is well-prepared, it’s time to plant your hot pepper plants. Although the pepper plants may still be small at this stage, the outdoor weather should be warm enough for them to be safely transplanted. Carefully remove each plant from the seed tray, taking care not to damage their roots.
Plant the peppers with about 8 to 10 inches of space between them. This spacing allows each plant to grow without competing for nutrients, sunlight, and air circulation. Proper spacing also helps prevent the spread of diseases by ensuring each plant has enough room to thrive.
Step 9: Applying a Diluted Weed Liquid Fertilizer
Once the plants are in the ground, they should be given a very diluted version of weed liquid fertilizer. This fertilizer, made using a natural process, is an excellent way to provide gentle nutrients to young plants without overwhelming their delicate roots. The diluted fertilizer provides essential minerals that support strong root development and overall plant health. It ensures that the plants receive a steady and gradual supply of nutrients, helping them establish themselves in the new bed.
Additional Tips
Using natural fertilizers like weed liquid fertilizer can be an effective way to recycle garden weeds into a valuable resource. If you’re interested in learning how to make this nutrient-rich fertilizer, there are tutorials available that can walk you through the process.
By following these steps, you will create an environment where your pepper plants can thrive. Properly preparing the soil, using organic fertilizers, and planting with enough space between plants will help ensure that your pepper plants grow strong, healthy, and yield a bountiful harvest. Happy gardening!