Efficient irrigation is one of the most crucial aspects of maintaining a healthy garden, especially in regions prone to dry spells or water restrictions. A well-designed drip irrigation system allows you to deliver water directly to the roots of your plants, minimizing waste and promoting healthier growth. Best of all, you don’t need expensive equipment or complicated systems. With just a 1000-liter water tank and a few basic materials, you can build your own sustainable and highly effective drip irrigation system at home.
This guide shows you how to create a low-cost drip watering setup that’s ideal for both home gardens and small organic farms.
Why Choose Drip Irrigation?
Drip irrigation is a water-efficient method that slowly delivers water directly to the base of each plant. It significantly reduces water evaporation and runoff compared to traditional watering methods like sprinklers or hand watering. This is especially important in organic gardening, where maintaining consistent soil moisture can make a big difference in plant health and productivity.
Benefits of drip irrigation include:
-
Water savings of up to 70%
-
Reduced weed growth (water goes only where needed)
-
Less risk of disease from wet leaves
-
Stronger root systems and more robust plant development
-
Time savings and automation possibilities
Materials You’ll Need
To create your own 1000-liter tank drip irrigation system, gather the following materials:
-
A 1000-liter plastic water tank (often used for agricultural or industrial purposes)
-
1/2-inch or 3/4-inch polyethylene irrigation tubing
-
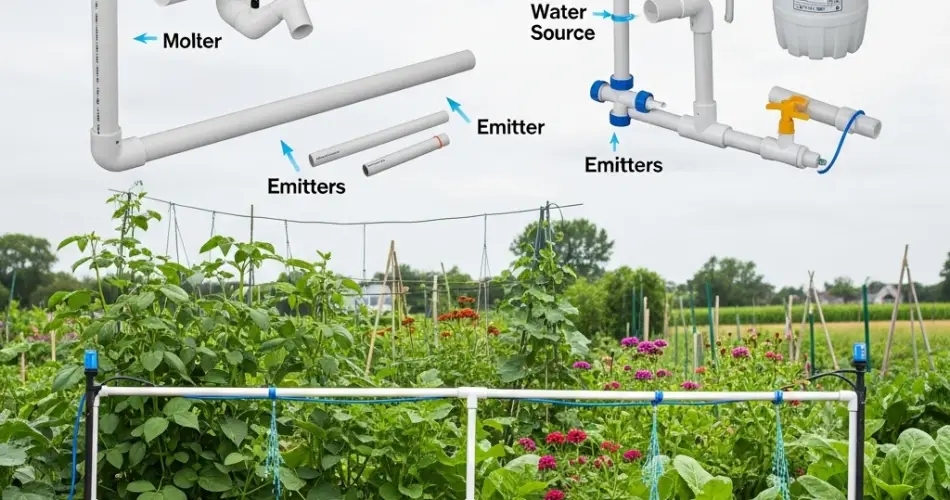
Drip emitters or micro-drippers
-
Connectors and elbows for tubing
-
A water filter (to avoid clogging)
-
A flow regulator or valve (to control pressure)
-
A simple stand or platform to elevate the tank (gravity-fed systems work best when elevated)
Optional:
-
Timer to automate watering intervals
-
Hose punch tool to install emitters
-
Teflon tape to seal threaded connections
Step-by-Step Setup
1. Position the Water Tank
Place your 1000-liter tank on a sturdy elevated platform. Even a height of 1–1.5 meters will improve water flow via gravity. The higher the tank, the stronger the pressure, but make sure the structure is stable and secure.
2. Install the Outlet and Filter
Drill a hole near the base of the tank and install a spigot or outlet valve. Attach the water filter immediately after the outlet—this is essential for removing debris and preventing clogs in the system.
3. Attach Main Tubing
Connect your main irrigation line (polyethylene tubing) to the outlet. Run this tubing along your garden rows or raised beds, positioning it where plants are growing.
4. Punch Holes and Insert Emitters
Use a hose punch tool to make holes in the tubing where each plant is located. Insert drip emitters or micro-drippers into each hole. These will control how much water each plant receives. Choose emitters based on your plant’s needs—some deliver 2 liters/hour, others more.
5. Add Connectors for Multiple Rows
If you have more than one row or bed, use elbows and connectors to branch out the tubing. Be sure to seal the end of each line to maintain pressure.
6. Test the System
Open the tank valve and check how water flows through the system. Make adjustments as needed—check for leaks, emitter clogs, or low pressure points. If needed, install a flow regulator or pressure reducer.
Tips for Optimal Performance
-
Clean the tank regularly to prevent algae buildup or sediment.
-
Use a fine mesh filter if your water source contains particles.
-
Install a timer for automated, consistent watering schedules.
-
Flush the system weekly to prevent blockages.
-
Check emitters frequently during hot seasons to ensure even watering.
-
Mulch your beds to retain moisture and complement the efficiency of the drip system.
Suitable for All Garden Types
This homemade drip irrigation system works well for:
-
Vegetable gardens
-
Herb beds
-
Flower beds
-
Fruit trees and berry bushes
-
Greenhouses
-
Urban rooftop gardens
Whether you grow in soil beds, raised beds, or containers, this system can be adapted to suit your layout.
Sustainable Gardening Made Simple
Using a 1000-liter water tank as the heart of your drip irrigation system not only makes watering easier but also promotes sustainable gardening practices. You can even fill the tank with rainwater, greywater (where safe and legal), or collected runoff, reducing reliance on mains water.
This setup is scalable—add more tubing and emitters as your garden expands, and pair it with organic fertilizers or compost tea through fertigation techniques.
Conclusion
A DIY drip irrigation system using a 1000-liter tank is a game changer for home gardeners and small-scale farmers. It’s efficient, low-cost, and eco-friendly. With minimal effort and basic materials, you can transform your watering routine and help your plants thrive while conserving one of Earth’s most precious resources: water.


