Growing potatoes doesn’t have to require a large plot of land or heavy digging. With the crate-growing method, you can enjoy a generous potato harvest from a small, tidy space. This simple approach combines efficiency, creativity, and practicality, making it ideal for beginner gardeners, busy families, or anyone working with limited yard space.
Why Grow Potatoes in Crates?
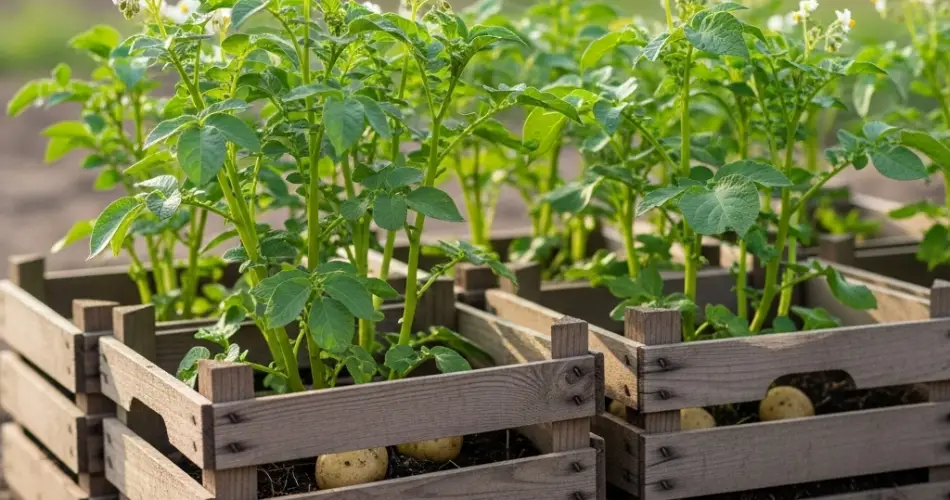
Traditional potato beds need plenty of room and deep soil. However, potatoes grow along their stems, meaning that if you keep adding soil as the plant grows, more tubers will form higher up. Crates make it easy to take advantage of this natural habit while keeping the soil contained and harvest simple.
Key benefits of crate-grown potatoes:
-
Space Saving – Perfect for small yards, patios, or balconies.
-
Easy Maintenance – Less bending, digging, and weeding compared to ground planting.
-
Better Drainage – Crates allow excess water to escape, helping to prevent rot.
-
Modular System – You can start with one crate and add more as the plant grows.
-
Simplified Harvest – Just unstack the crates to collect potatoes with minimal effort.
Choosing the Right Crates
The best crates are sturdy, untreated wooden ones that can handle stacking. Avoid crates made from chemically treated wood, as these chemicals could leach into the soil. Each crate should have gaps between slats or drilled holes for proper drainage.
If you want to reduce soil loss, you can line the inside with burlap or landscape fabric. This still allows water to pass through while keeping soil neatly contained.
Selecting Potato Varieties
When growing potatoes in crates, choose early or mid-season varieties. These mature faster and don’t require as much depth as late-season types.
Popular choices include:
-
Early Varieties – ‘Red Norland,’ ‘Yukon Gold,’ ‘Annabelle’
-
Mid-Season Varieties – ‘Kennebec,’ ‘Purple Majesty,’ ‘Chieftain’
If you have a long growing season and deep enough crates, you can experiment with late-maturing varieties as well.
Materials You’ll Need
To set up your crate potato garden, you’ll need:
-
3–4 untreated wooden crates
-
Seed potatoes
-
Quality potting mix enriched with compost
-
Straw or shredded leaves for mulching
-
A sunny location (at least 6–8 hours of direct sunlight per day)
Planting Potatoes in Crates
-
Prepare the First Crate
Place the crate in your chosen sunny spot. Fill it with 6–8 inches of loose, nutrient-rich soil. -
Position the Seed Potatoes
Set 3–4 seed potatoes in the crate, eyes facing upward. Space them evenly to prevent overcrowding. -
Cover and Water
Add 3–4 inches of soil over the seed potatoes and water lightly to settle the soil. Avoid waterlogging.
Growing and Adding Crates
As the potato plants grow and their stems reach about 6–8 inches above the soil surface, it’s time to encourage upward tuber production.
-
Stack the Second Crate
Place it on top of the first. Carefully fill around the growing stems with more soil until only the top leaves are exposed. -
Continue the Process
Repeat this stacking and filling process each time the plants grow another 6–8 inches. Most setups use 3–4 crates in total. -
Mulch to Retain Moisture
Adding a layer of straw or shredded leaves on top of the soil helps retain moisture and keeps the growing potatoes from being exposed to light.
Watering and Feeding
Potatoes need consistent moisture for healthy growth. In hot weather, you may need to water every day, especially since crates drain faster than ground beds.
-
Check Moisture Levels – Soil should be evenly damp but not soggy.
-
Fertilize Regularly – Every 2–3 weeks, feed with compost tea or a balanced vegetable fertilizer to encourage strong growth and tuber formation.
Dealing with Pests and Problems
-
Colorado Potato Beetles – Inspect plants regularly and remove beetles by hand.
-
Blight – Avoid overhead watering and ensure good air circulation to reduce the risk.
-
Rodents – If necessary, line the bottom crate with fine mesh to keep out burrowing pests.
Harvesting Potatoes from Crates
Potatoes are ready when the plant’s foliage yellows and begins to die back.
For baby potatoes:
Harvest 2–3 weeks after the plants flower by removing the lower crate and gently sifting through the soil.
For mature potatoes:
Wait until all the foliage is dry. Unstack the crates, and scoop out the tubers as you go. This is much easier than digging in a traditional garden bed.
Post-Harvest Storage
-
Cure the Potatoes – Place them in a cool, dark, and well-ventilated space for 1–2 weeks to toughen the skins.
-
Store Properly – Keep them in breathable bags or boxes in a cool, dark location.
-
Avoid Refrigeration – Cold temperatures convert potato starch into sugar, altering taste and texture.
Final Thoughts
Crate-grown potatoes are an excellent option for anyone looking to maximize small spaces while keeping gardening fun and manageable. This method requires minimal digging, is adaptable to many environments, and delivers a satisfying yield. Whether you have a backyard, balcony, or just a small sunny corner, you can enjoy the taste of fresh, homegrown potatoes without needing a traditional garden bed.


