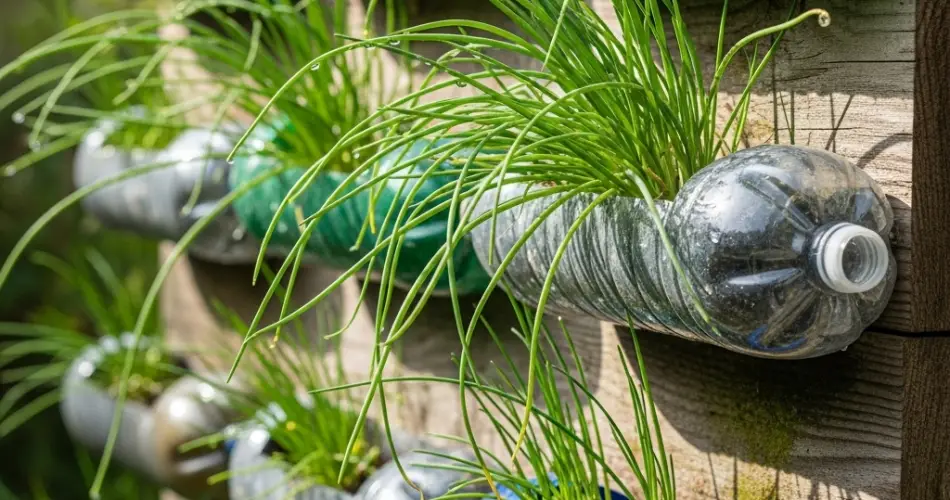
Chives are one of the easiest and most rewarding herbs to grow, adding a gentle onion flavor to dishes and offering beautiful, slender green leaves for garnishing meals. For gardeners with limited ground space, creating a chive garden tower from recycled bottles is an excellent solution. This vertical growing system is eco-friendly, space-saving, and highly productive, giving you fresh chives right at your fingertips.
Using discarded plastic bottles not only reduces waste but also provides an inexpensive alternative to traditional pots. When arranged into a vertical tower, they create a compact herb garden that can be placed on a balcony, patio, or even indoors near a sunny window.
Why Choose a Bottle Garden Tower?
A chive garden tower offers several advantages:
-
Space efficiency – Perfect for apartments, balconies, or small gardens.
-
Sustainability – Reuses plastic bottles that would otherwise be discarded.
-
Easy harvesting – Keeps herbs at a comfortable height.
-
Portability – Can be moved to follow sunlight or relocated easily.
Materials You’ll Need
-
5–8 clean plastic bottles (1.5 or 2 liters)
-
Sharp scissors or a utility knife
-
Quality potting soil mixed with compost
-
Chive seeds or seedlings
-
Wooden stake, bamboo pole, or PVC pipe for central support
-
Rope, cable ties, or strong tape
-
Drill or heated nail for drainage holes
-
Optional: non-toxic paint or fabric for decoration
Step 1: Prepare the Bottles
-
Clean and remove labels – Wash bottles thoroughly to get rid of any residue.
-
Cut openings – Depending on your design, you can cut the side of each bottle to create a planting pocket or remove the top section for a more traditional pot shape.
-
Make drainage holes – Drill or poke several small holes in the bottom of each bottle to prevent waterlogging.
-
Decorate if desired – Use non-toxic paint or wrap to give the tower a more polished look and protect the bottles from UV damage.
Step 2: Build the Tower Structure
There are two popular ways to assemble a chive garden tower:
Stacked method:
-
Thread a central wooden stake or PVC pipe through holes cut in the bottle bases.
-
Stack bottles one above the other, tilting planting openings outward for easy access.
-
Secure each layer with cable ties or rope to prevent shifting.
Hanging tier method:
-
Attach bottles horizontally to a vertical frame or wall using hooks or ropes.
-
Arrange them in staggered rows so that upper bottles do not drip directly onto lower plants.
Whichever method you choose, ensure the structure is stable enough to hold the weight of soil, water, and plants.
Step 3: Prepare the Soil
Chives prefer loose, nutrient-rich soil that drains well. A suitable blend includes:
-
2 parts potting soil
-
1 part compost
-
A small amount of perlite or coarse sand for aeration
Mix thoroughly before filling each bottle.
Step 4: Plant the Chives
From seeds:
-
Fill bottles with soil, leaving about 2–3 cm of space at the top.
-
Sprinkle seeds evenly and cover with a thin layer of soil.
-
Water gently so seeds remain in place.
From seedlings:
-
Make a small hole in the soil, place the seedling at the same depth it was growing previously, and gently firm the soil around the roots.
-
Water lightly to settle the soil.
Step 5: Light and Watering Needs
Place your chive tower in a location that receives at least 6 hours of sunlight daily. If indoors, choose a bright window or use grow lights.
Hanging or vertical containers can dry out faster than traditional pots, so check soil moisture regularly. Water when the top layer feels slightly dry, making sure excess water drains freely.
Step 6: Ongoing Maintenance
-
Fertilizing – Apply a diluted liquid fertilizer every 4–6 weeks for healthy growth.
-
Pruning – Trim leaves regularly to encourage new shoots and prevent flowering, which can reduce leaf flavor.
-
Pest management – Chives naturally deter many pests, but if aphids appear, rinse them off with water or use a mild natural spray.
-
Tower stability check – Periodically ensure the structure remains secure, especially after strong winds or heavy rain.
Step 7: Harvesting
When chives reach about 15 cm in height, they are ready to harvest. Use scissors to cut leaves from the base, leaving at least 5 cm so they can regrow quickly.
Frequent harvesting promotes more abundant leaf production, and fresh chives are best used immediately for maximum flavor. You can also chop and freeze them for later use.
Benefits Beyond Fresh Herbs
A chive garden tower made from recycled bottles is more than just a way to grow food—it’s also a conversation piece and a step toward sustainable living. It turns waste into something functional and beautiful, inspires creative gardening, and brings greenery to areas that might otherwise be unused.
Final Thoughts
With a little creativity, some recycled materials, and basic gardening skills, you can build a productive chive garden tower that fits even the smallest spaces. This project reduces waste, cuts down on grocery trips, and ensures you always have fresh herbs at your fingertips. Whether you place it on a sunny balcony, in a compact backyard, or near your kitchen window, your bottle tower will bring both beauty and flavor to your daily life.


