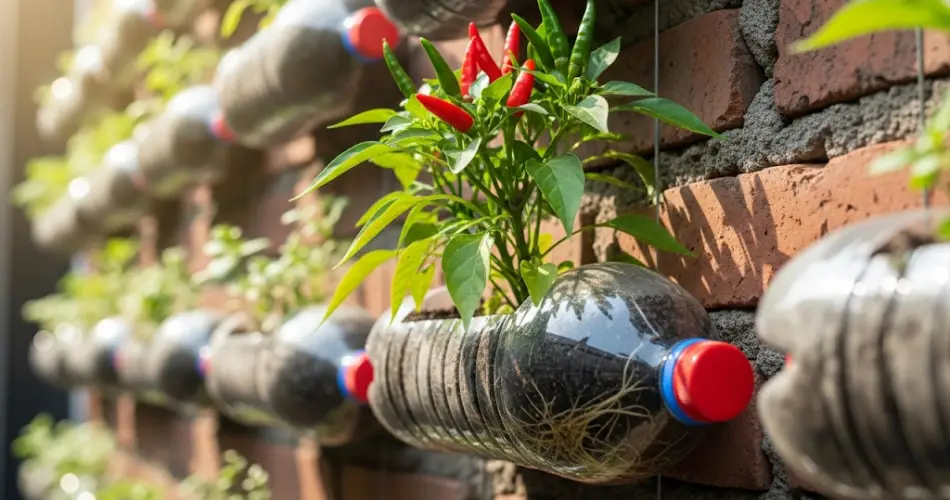
If you’re living in a small urban space but dream of growing your own spicy chilies, there’s an efficient and eco-friendly solution: bottle wall gardening. With just a few plastic bottles, a sunny vertical surface, and a bit of care, you can cultivate a thriving chili garden—even without soil beds or large containers.
This method maximizes limited space and uses recycled materials, making it perfect for balconies, patios, fences, or any outdoor wall that receives sunlight. Here’s how to create a productive chili pepper wall garden using smart bottle techniques.
Why Grow Chilies in Bottles on a Wall?
Chili peppers are compact, easy to manage, and offer vibrant, flavorful harvests. They grow well in containers, and when arranged vertically, the benefits multiply:
-
Space-saving: Vertical gardens use walls, freeing up horizontal space.
-
Sustainable: Plastic bottles are repurposed, reducing waste.
-
Beautiful and functional: The green leaves and colorful peppers make an eye-catching display.
-
Productive: Chili plants can produce a generous yield even in small growing areas.
This method is particularly suitable for people with no backyard but plenty of vertical exposure to sun.
Choosing the Right Chili Variety
For wall gardens, select compact chili varieties that don’t require deep root space or heavy support. Good options include:
-
Thai chili – small and fiery, perfect for compact containers.
-
Bird’s Eye chili – another space-efficient and prolific producer.
-
Jalapeño – manageable in size and great for fresh use or pickling.
-
Mini bell peppers – colorful, mild, and ornamental.
-
Cayenne – grows well in vertical containers when trimmed for size.
Avoid large-fruiting or sprawling varieties unless you can commit to heavier support and maintenance.
Materials Needed
To build a chili wall garden, you’ll need:
-
Empty 1.5L or 2L plastic bottles
-
A sharp cutter or knife
-
A drill or heated nail for holes
-
Zip ties, wire, or sturdy string
-
A wooden frame, wire grid, or fence wall for mounting
-
Quality potting mix
-
Compost or organic fertilizer
-
Chili seedlings or seeds
Make sure all bottles are clean and dry before use.
How to Prepare the Bottle Planters
-
Cut an Opening
Lay each bottle horizontally and cut out a window on one side, leaving the cap on. This opening should be large enough for planting and watering but not so wide that the bottle loses structure. -
Add Drainage Holes
Use a drill or a hot nail to poke 3–5 drainage holes at the bottom of the bottle. Proper drainage is crucial for root health. -
Mounting Setup
Attach bottles to a wall, trellis, or wooden rack using zip ties or wire. Arrange them in staggered rows so each plant receives ample light and airflow. -
Optional Bottom Wick
For better moisture retention, some gardeners add a piece of cloth or rope through the cap to act as a wick, drawing up water from a container below.
Planting Process
-
Soil Mix: Use well-draining potting soil enriched with compost. A mix of cocopeat, sand, and organic matter works best.
-
Seedling or Seed: Transplant one healthy chili seedling per bottle. Alternatively, sow two seeds per bottle and thin to one plant after germination.
-
Watering: Water thoroughly after planting to help roots settle.
Daily and Weekly Care
Sunlight
Chilies thrive in full sun. Choose a wall that gets at least 6–8 hours of direct light daily.
Watering
Wall gardens dry out quickly. Water every day or every other day, depending on weather. Avoid waterlogging.
Feeding
Apply compost tea or diluted organic fertilizer every 2–3 weeks. Crushed eggshells or banana peels can also be added for nutrients.
Pruning
Remove any yellowing leaves or suckers. Pinch the tips to encourage bushy growth and more fruiting branches.
Supporting the Plants
As peppers grow and start to fruit, the branches may droop. Use soft ties or string to secure them gently to the bottle or supporting frame.
Pest Management
Chili plants are relatively pest-resistant, but be on the lookout for:
-
Aphids and mites – remove with a blast of water or neem oil spray.
-
Fungal issues – prevent by ensuring good airflow and not wetting leaves during watering.
Regular inspection keeps your garden healthy.
Harvesting Your Chilies
Chilies typically take 60–90 days from transplant to harvest. Once the fruit reaches full size and ripens to its final color (usually red, yellow, or orange), it’s ready for picking.
Use scissors or garden snips to avoid damaging the stem. Picking regularly encourages more fruiting.
Maintenance Tips
-
Rotate the bottles seasonally for even light exposure.
-
Replace the soil every growing season to avoid nutrient depletion.
-
Clean bottle surfaces occasionally to prevent algae buildup.
If any plant becomes too large or root-bound, gently transplant it into a larger container or garden bed.
Final Thoughts
A chili pepper wall garden is more than just a clever space-saving idea—it’s a beautiful and sustainable way to grow food at home. With a few recycled bottles and basic supplies, you can transform a bare wall into a vibrant, spicy harvest zone.
It’s a perfect project for urban gardeners who want to grow their own produce while making the most of limited space. Start small, experiment with your favorite varieties, and enjoy the satisfaction of homegrown heat.


