Casting Beautiful Flower Pots from Cement for Your Patio and Front Yard Garden
When it comes to enhancing the look of your patio or front yard garden, one of the most cost-effective and creative ways to do so is by making your own flower pots. Cement flower pots are not only sturdy and durable but also add a unique, artistic touch to your garden space. Whether you’re a seasoned gardener or a DIY enthusiast, creating your own flower pots from cement can be a fun and rewarding project.
In this article, we’ll walk you through the steps to create beautiful cement flower pots for your garden. With just a few simple materials and a little creativity, you’ll be able to craft pots that perfectly complement your outdoor space.
Why Choose Cement Flower Pots?
Before we dive into the process of casting cement flower pots, let’s talk about why cement is a fantastic material for garden pots:
-
Durability: Cement is incredibly strong and can withstand various weather conditions, including heat, rain, and frost, making it perfect for outdoor use.
-
Customization: Cement pots can be molded into different shapes and sizes, allowing you to create personalized designs for your garden.
-
Aesthetic Appeal: Cement has a natural, rustic look that blends well with both modern and traditional garden styles. You can also decorate or paint cement pots to suit your personal taste.
-
Affordability: Making your own pots out of cement is much more affordable than buying ready-made pots from the store, especially if you’re creating multiple pots.
Materials You Will Need
To get started with making your own cement flower pots, you will need the following materials:
-
Cement mix (you can find pre-mixed bags of cement at any home improvement store)
-
Water (to mix with the cement)
-
Plastic containers or molds (such as old buckets, bowls, or plastic bottles)
-
Cooking oil or petroleum jelly (to grease your molds for easy removal)
-
A stirring stick or trowel (for mixing the cement)
-
Gloves and protective gear (to keep your hands safe while handling cement)
-
Decorative materials (optional, such as stones, beads, or paint for decoration)
-
Plastic sheet or tarp (to cover the work area and prevent the cement from spilling)
Step-by-Step Guide to Making Cement Flower Pots
1. Choose Your Molds
Start by selecting the molds that will shape your cement pots. The outer mold can be a plastic bucket, bowl, or any container that has the desired shape and size for your pot. For the inner mold (the cavity where the plant will sit), you can use a smaller container, such as a plastic cup or bottle. The inner mold will create the space inside the cement pot where your plants will go.
You can also create various sizes of pots by using different-sized molds, or even get creative and use objects like large balloons or plastic food containers for unique shapes.
2. Prepare Your Molds
Before mixing the cement, make sure your molds are ready. Coat both the inner and outer molds with a thin layer of cooking oil or petroleum jelly. This step will prevent the cement from sticking to the mold and make it easier to remove the finished pot once it’s dry.
Place the molds on a plastic sheet or tarp to protect your work surface from any cement spills.
3. Mix the Cement
Now, it’s time to mix your cement. In a large container or bucket, combine the dry cement mix with water according to the instructions on the package. Stir the mixture with a trowel or stirring stick until it reaches a thick, smooth consistency—similar to pancake batter. You want it thick enough to hold its shape but still pourable.
If you’re making several pots, consider mixing multiple batches of cement to ensure you have enough for all your molds.
4. Pour the Cement Into the Molds
Start by pouring the mixed cement into the outer mold. Fill it about halfway, then insert the smaller inner mold. Press the inner mold down gently to create the shape of the pot, leaving enough space for the plant’s roots. You can adjust the depth of the pot by moving the inner mold up or down until you’re satisfied with the size.
Make sure to tap the sides of the outer mold gently to release any air bubbles in the cement, which will help ensure a smooth finish.
5. Let the Cement Set
After you’ve filled the molds, leave the cement to set and harden. This can take anywhere from 24 to 48 hours, depending on the thickness of the cement and the humidity of your environment. During this time, make sure the cement is not disturbed.
To speed up the drying process, you can cover the cement with a plastic sheet or tarp, which will help prevent it from drying too quickly and cracking.
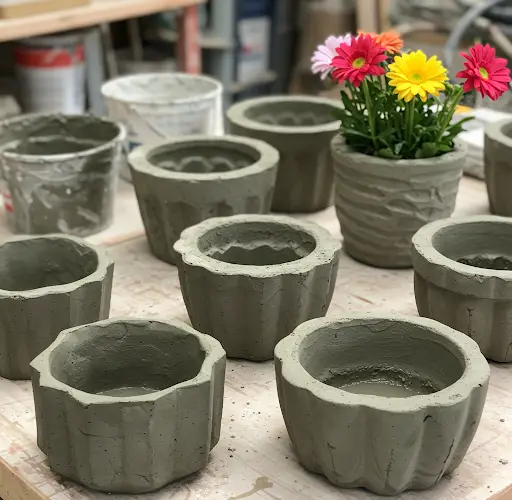
6. Remove the Molds
Once the cement has completely dried and hardened, gently remove the inner and outer molds. You may need to tap the molds lightly or use a plastic scraper to loosen the cement pot. Be patient—if the pot is still a bit damp, it may take a little extra effort to remove the molds without cracking the cement.
If you’re using a mold with a more intricate design, be especially careful when removing the pot to avoid damaging the shape.
7. Customize Your Pots
At this point, you can leave your cement pots as-is for a rustic, natural look, or you can paint and decorate them to match your outdoor decor. Consider adding some texture or painting the pots in bright colors to add personality and style to your garden.
You can also attach decorative materials like stones, beads, or moss to the surface of the pots for added flair.
Tips for Success
-
Safety First: Always wear gloves and protective gear when working with cement to protect your hands and eyes.
-
Use Quality Cement: Choose a high-quality cement mix for the best results, as cheaper brands may crack more easily.
-
Allow Adequate Drying Time: Don’t rush the drying process. Make sure the cement is fully set before removing the molds to avoid breaking or damaging the pot.
-
Consider Drainage: If you want to make sure your plants don’t drown, be sure to create drainage holes in your pots. You can easily do this by using a nail or screw to make small holes in the bottom of the pots before pouring the cement.
Conclusion
Casting your own cement flower pots is a simple yet rewarding project that can add a unique and stylish touch to your garden, patio, or front yard. With a few basic materials and some creativity, you can craft durable, beautiful pots that will enhance the overall look of your outdoor space. Whether you prefer a minimalist design or want to add colorful decorative touches, cement flower pots are a fantastic way to showcase your plants in a stylish and practical way. Give this DIY project a try, and you’ll have beautiful custom pots that are sure to impress!