Carrots are one of the most versatile and popular root vegetables in the garden. Known for their crisp texture and sweet flavor, they are used in everything from fresh salads to hearty soups. While many gardeners assume that carrots need large garden beds to thrive, these roots can actually be grown successfully in small containers—even in recycled plastic bottles. Bottle propagation is an easy, space-saving method that allows you to enjoy homegrown carrots anywhere, whether on a balcony, patio, or sunny windowsill.
Why Grow Carrots in Bottles?
Carrots are often tricky to germinate outdoors because their tiny seeds need consistent moisture and light soil. Sudden heavy rains can wash them away, and uneven watering may prevent them from sprouting evenly. Bottles solve many of these issues. Their enclosed structure retains moisture, prevents seed loss, and creates a warm microclimate that encourages strong germination.
For urban gardeners, bottles are also a practical choice. They fit neatly into tight spaces, can be arranged vertically, and are easy to move for better sunlight. At the same time, they promote sustainability by giving discarded bottles a new purpose.
Choosing the Right Bottle
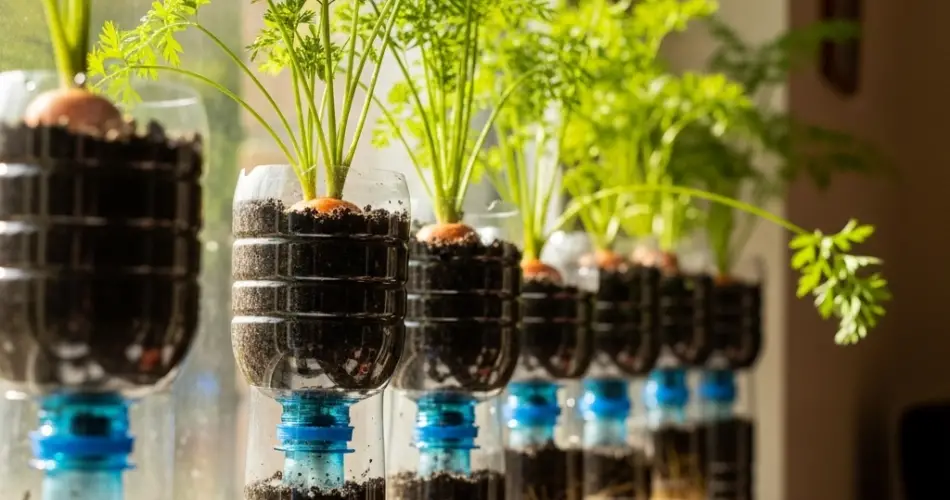
Large, clear bottles—such as two-liter soda or water bottles—work best for carrots. Since carrot roots grow deep, the container must be tall enough to allow proper root formation. Short bottles may cause roots to become stunted or forked. Before use, wash bottles thoroughly and remove any labels so sunlight can penetrate.
There are two main ways to use bottles for carrot propagation:
-
Vertical Bottles – Filled completely with soil and sown with carrot seeds at the top.
-
Bottle Domes – Cut into halves, where the top acts as a cover for germinating seeds in the ground or in pots.
Both methods are effective and can be adapted to the space you have available.
Preparing the Soil
Carrots thrive in loose, well-drained, sandy soil that is free from stones or clumps. Heavy or compacted soil can cause roots to split or grow misshapen. For bottle planting, prepare a light mix of garden soil, compost, and sand. Avoid using too much nitrogen-rich fertilizer, which promotes leafy tops rather than healthy roots.
Fill the bottle with the prepared mix, tapping it gently to eliminate air pockets. Leave some space at the top to make watering easier.
Sowing Carrot Seeds
Carrot seeds are very small, so sow them sparingly. Scatter them evenly over the soil surface and cover with a thin layer of soil—no more than 0.5 cm (¼ inch). Water gently so the seeds settle without being displaced.
If you are using the bottle dome method, sow seeds directly in a garden bed or container, then place the cut bottle top over the soil to create a greenhouse effect. This helps keep the surface moist, which is essential for carrot germination.
Caring for Germinating Seeds
Carrot seeds can take 10 to 20 days to germinate, so patience is key. During this time, keep the soil consistently moist but not soggy. Bottles make this easier by reducing evaporation, but you should still check moisture regularly.
If using vertical bottles, ensure they are placed in a sunny spot that receives at least six hours of light daily. For bottle domes, remove the cap during the day to allow ventilation and prevent overheating.
Thinning and Maintenance
Once seedlings reach about 5 cm (2 inches) tall, thin them to 2–3 cm (1 inch) apart. Proper spacing is essential for developing straight, uniform carrots. Use scissors to snip weaker seedlings at the soil line rather than pulling them out, which can disturb nearby roots.
Keep the soil consistently moist as the plants mature. Uneven watering can cause carrots to split or become woody. If growing in bottles, remember that soil volume is limited, so water may dry out faster than in larger containers or garden beds.
Harvesting Carrots from Bottles
Depending on the variety, carrots are usually ready to harvest in 60 to 80 days. Check by gently pulling one or two to see if they have reached the desired size. Smaller carrots are often sweeter and more tender, while larger ones can be stored longer.
To harvest, loosen the soil by gently squeezing the sides of the bottle or carefully cutting the plastic away. This makes it easier to remove the roots without breaking them.
Benefits of Bottle Propagation
-
Space-saving: Perfect for balconies, patios, or small gardens.
-
Eco-friendly: Reuses plastic bottles, reducing household waste.
-
Improved germination: Retains warmth and moisture for reliable sprouting.
-
Portable: Easy to move bottles to capture better sunlight or shelter from rain.
-
Accessible: A simple and low-cost method for beginner gardeners.
Conclusion
Carrots don’t require a large vegetable patch to thrive. With a little creativity, you can grow them successfully in recycled plastic bottles. This propagation method ensures steady germination, saves space, and supports sustainable gardening practices. Whether you are an urban gardener with limited room or simply want a fun project for fresh, homegrown carrots, bottle propagation is a practical technique that works anywhere. With patience and care, you’ll be rewarded with crisp, flavorful carrots ready to enjoy straight from your own eco-friendly garden.


