Carrots are a favorite among home gardeners, not only for their sweet and earthy flavor but also for their versatility in the kitchen. However, growing carrots from seed can sometimes feel challenging, especially for beginners. Their tiny seeds are easily disturbed by wind, rain, or overwatering, and germination can be slow. Luckily, there is a simple and effective method that makes the process easier—using plastic bottles for propagation. This eco-friendly technique helps ensure steady germination, saves space, and gives gardeners more control over the early stages of carrot growth.
Why Choose Bottle Propagation for Carrots?
Carrot seeds need specific conditions to germinate well: loose soil, consistent moisture, and warmth. Traditional outdoor sowing often exposes them to uneven watering, soil crusting, or pests that hinder sprouting. Bottle propagation creates a mini-greenhouse effect that protects seeds, retains moisture, and encourages a stable environment.
For those gardening in small spaces such as balconies, patios, or windowsills, bottle propagation also offers the benefit of compact growing containers. Instead of relying on a large vegetable patch, you can grow carrots almost anywhere by reusing a simple household item.
Selecting and Preparing Bottles
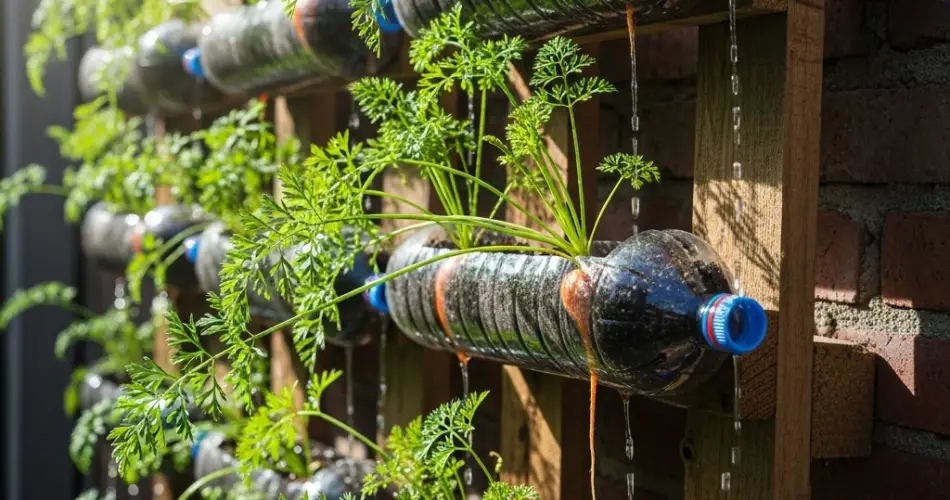
The best bottles for carrot propagation are clear, tall ones—usually one- to two-liter water or soda bottles. Carrots grow deep roots, so the height of the container is important. Wash the bottles thoroughly to remove any residues and peel off the labels to allow full light penetration.
There are two popular approaches to bottle use:
-
Vertical Planters – The bottle is kept intact, filled with soil, and used as a container where carrot seeds are sown at the top.
-
Bottle Domes – The bottle is cut in half, with the top half serving as a humidity dome over soil in a pot or garden bed.
Both options protect seedlings during the critical germination stage and can be adapted to the resources and space you have.
Preparing the Soil Mix
Carrots prefer light, sandy, and well-drained soil. Heavy or compact soil can restrict root growth and cause carrots to fork or become misshapen. A simple propagation mix can be made from equal parts garden soil, compost, and coarse sand. The compost provides nutrients, while the sand ensures good drainage and aeration.
Fill the bottle with this mixture, leaving a small gap at the top to prevent spillage when watering. Lightly tap the bottle to settle the soil without compacting it.
Sowing Carrot Seeds
Carrot seeds are extremely fine, so they should be sown thinly. Scatter them evenly on the soil surface and cover with a very light layer of soil—just about 0.5 cm (¼ inch). Because seeds require consistent moisture, mist the surface gently with water instead of pouring directly, which could dislodge them.
If using the dome method, place the bottle top over the sowed area and keep the cap loosely on or off to allow some ventilation. This creates a warm, moist environment ideal for sprouting.
Germination and Early Care
Carrot seeds usually take between 10 and 20 days to germinate. During this time, the key is to maintain steady moisture without waterlogging. Bottles make this easier by preventing rapid evaporation while still allowing light to penetrate.
Keep bottles in a sunny location where they receive at least six hours of sunlight per day. If daytime temperatures rise too high, slightly lift or remove the bottle cap to prevent overheating.
Thinning Seedlings
Once seedlings reach 5–7 cm (about 2–3 inches) in height, they should be thinned out to provide space for roots to develop properly. Aim for 2–3 cm spacing between plants. Instead of pulling seedlings—which may disturb the roots of their neighbors—use scissors to snip weaker plants at the soil line.
Ongoing Maintenance
As seedlings grow, water regularly but lightly. Because bottles contain limited soil, they can dry out faster than larger pots or garden beds. Monitor moisture levels closely, keeping the soil evenly damp. Overwatering should also be avoided, as it can cause fungal problems or rot.
You may also rotate or move the bottles as needed to ensure all plants receive even light exposure.
Harvesting Carrots from Bottles
Carrots are usually ready to harvest within 60 to 80 days, depending on the variety. You’ll notice their leafy tops becoming lush, and in some cases, the shoulders of the carrots may peek above the soil.
To harvest, gently squeeze or cut the plastic bottle to loosen the soil and remove the carrots without breaking the roots. Smaller carrots are often sweeter and more tender, while larger ones may store longer.
The Benefits of Bottle Propagation
-
Eco-friendly: Repurposes discarded bottles, reducing waste.
-
Space-efficient: Perfect for balconies, patios, or small gardens.
-
Controlled environment: Maintains warmth and moisture for reliable germination.
-
Beginner-friendly: Simple method that makes starting carrots less intimidating.
-
Portable: Bottles can be moved easily for better sunlight or shelter.
Final Thoughts
Bottle propagation transforms the often tricky process of carrot seed germination into something simple, efficient, and accessible. By creating a miniature greenhouse environment, this method ensures healthier seedlings and a more reliable harvest. Whether you have a backyard, a small balcony, or just a sunny windowsill, carrots can be successfully grown in bottles, giving you fresh, homegrown produce in an eco-friendly way.
With this easy approach, anyone can enjoy the satisfaction of growing crisp, flavorful carrots right at home—proof that with a little creativity, gardening truly can be done anywhere.


