Cabbage is a cool-season vegetable known for its dense, leafy heads and nutritional value. It’s commonly grown in garden plots, but with the rise of urban gardening, more and more people are discovering how easy it is to grow cabbage in containers—including wooden crates. Whether you live in an apartment or a house with limited outdoor space, you can still cultivate crisp, homegrown cabbage right on your balcony.
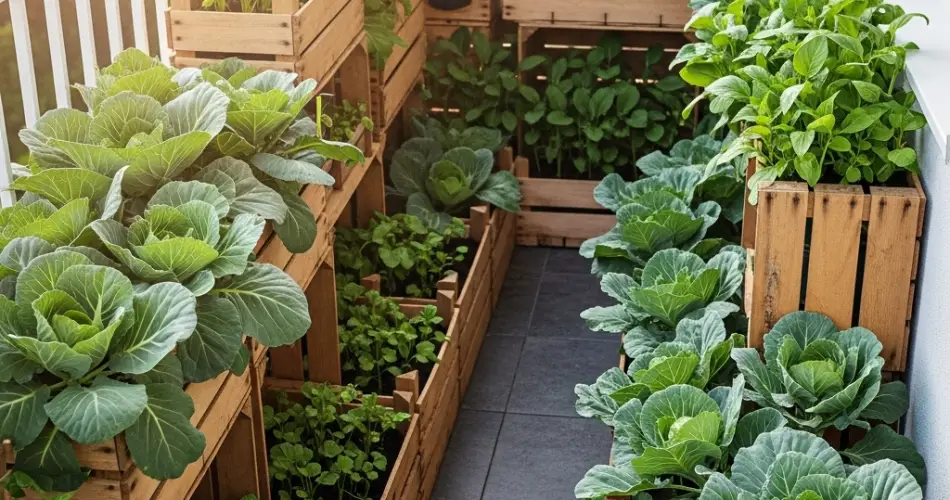
Wooden crates offer a spacious, breathable, and attractive solution for growing vegetables in compact environments. With the right setup and a little care, crate-grown cabbage can thrive and deliver fresh, delicious results.
Why Grow Cabbage in Wooden Crates?
Wooden crates are a great choice for urban gardeners for several reasons:
-
Good root space: Cabbage has a relatively shallow root system that does well in crates with 10–12 inches of depth.
-
Excellent drainage: Crates typically offer great water drainage, preventing root rot and overwatering issues.
-
Portability: You can move crates around to catch optimal sunlight or shelter the plants during extreme weather.
-
Eco-friendliness: Reusing crates is a sustainable gardening solution that reduces waste.
-
Space-efficient: Ideal for balconies, rooftops, patios, and small yards.
Cabbage requires steady moisture, nutrient-rich soil, and adequate sun exposure, all of which can be easily managed in a crate setup.
Best Cabbage Varieties for Container Gardening
When selecting cabbage for crate gardening, choose compact or early-maturing varieties that won’t outgrow the space.
Recommended varieties include:
-
Golden Acre – Early-maturing with small, tight heads perfect for containers.
-
Pixie – A dwarf variety ideal for small spaces and container growth.
-
Red Express – A colorful red cabbage that matures quickly.
-
Savoy types – Tolerant to cold and have textured, tender leaves.
-
January King – Cold-hardy and suitable for balcony winter gardening.
These varieties mature within 60–80 days and are less prone to bolting in fluctuating weather.
Materials You’ll Need
Before planting, gather the following materials:
-
A wooden crate (at least 12 inches deep and 14–16 inches wide)
-
Landscape fabric or coconut liner
-
Potting mix and compost
-
Slow-release vegetable fertilizer
-
Cabbage seedlings or seeds
-
Watering can or hose with a fine spray
-
Garden trowel
Line crates that have gaps or slats with landscape fabric to keep the soil in while allowing for proper drainage.
Preparing the Crate
-
Line the crate with landscape fabric or a coconut liner if necessary.
-
Create a soil mix by combining:
-
2 parts potting soil
-
1 part compost or aged manure
-
A handful of perlite or coarse sand to aid drainage
-
-
Mix in a slow-release fertilizer formulated for leafy vegetables.
Fill the crate up to 1 inch below the rim and lightly moisten the soil before planting.
Planting Your Cabbage
You can start cabbage from seeds indoors or transplant seedlings directly into the crate once temperatures are mild.
-
Space seedlings 12–16 inches apart, depending on the variety.
-
Plant deeply, covering the stem up to the first set of leaves to encourage strong root development.
-
Water thoroughly after planting to help the roots establish.
Position your crate in a location that receives at least 6 hours of sunlight daily. Cabbage thrives in full sun but can tolerate partial shade, especially in hot climates.
Watering and Fertilizing
-
Keep soil consistently moist, but avoid overwatering. Cabbage needs regular water to develop firm heads.
-
Mulch with dried leaves or straw to retain moisture and reduce weed growth.
-
Fertilize every 3–4 weeks with a liquid organic fertilizer or compost tea, particularly once the plants begin forming heads.
Irregular watering or nutrient deficiencies can result in poor head formation or splitting.
Pest and Disease Management
Cabbage is a favorite of common garden pests like cabbage worms, aphids, and flea beetles. To protect your plants:
-
Use floating row covers to shield young plants.
-
Inspect leaves regularly, especially the undersides.
-
Handpick pests or apply neem oil or insecticidal soap when needed.
-
Rotate crops and avoid planting brassicas in the same soil season after season to reduce disease risks.
Good airflow and avoiding overhead watering will also help prevent mildew and rot.
Harvesting Your Crate-Grown Cabbage
Most cabbage varieties are ready to harvest when the head feels firm and reaches its mature size.
-
Cut the head off at the base with a sharp knife, leaving the outer leaves and roots intact.
-
If the weather is still favorable, new side shoots may sprout from the remaining stem and produce smaller, secondary heads.
Harvest promptly to avoid splitting, especially after heavy rainfall or sudden temperature changes.
Final Thoughts
Growing cabbage in wooden crates is a practical and rewarding way to enjoy fresh produce in limited space. With proper soil, regular watering, and a little attention to pests, you can grow crisp, healthy cabbage right on your balcony. This method is perfect for urban dwellers who want to experience the joys of gardening and the satisfaction of harvesting their own vegetables—even in the middle of the city. Whether you’re growing for salads, stir-fries, or pickling, crate-grown cabbage is a flavorful addition to your home garden.


