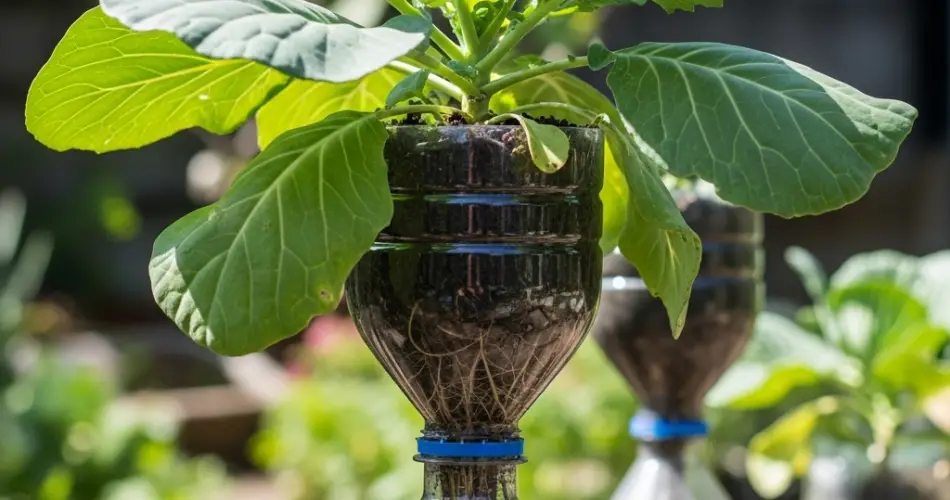
Cabbage is a staple vegetable that thrives in many gardens, valued for its crisp leaves and versatility in the kitchen. For gardeners aiming to grow cabbage efficiently, propagating cabbage starts using recycled plastic bottles offers an innovative and space-saving shortcut. This method not only recycles materials but also provides an effective environment to nurture healthy young plants before transplanting them into the garden.
This article explains how to propagate cabbage in bottles step by step, making the process accessible and rewarding for gardeners of all levels.
Why Propagate Cabbage in Bottles?
Using plastic bottles as propagation containers presents several advantages:
-
Sustainability: Reusing bottles reduces plastic waste and supports eco-friendly gardening.
-
Space Saving: Bottle planters are compact, ideal for limited garden space or indoor propagation.
-
Controlled Environment: Bottles act like mini-greenhouses, maintaining humidity and warmth for faster growth.
-
Visibility: Clear bottles allow monitoring of root development and soil moisture.
-
Cost-Effective: Bottles eliminate the need for purchasing specialized seed trays.
What You Will Need
-
Clean, empty plastic bottles (1 to 2 liters)
-
Sharp scissors or a utility knife
-
Seed-starting mix or light potting soil
-
Cabbage seeds or seedlings
-
Water
-
Spray bottle for watering
-
String or wire for hanging (optional)
-
Labels or markers for identification
Step 1: Preparing the Bottles
Wash the plastic bottles thoroughly to remove any residue. Remove labels so you can clearly see inside.
Cut the bottles horizontally about one-third from the top to create two parts. The bottom portion will serve as the planter, and the top can be inverted to act as a humidity dome.
Make several small drainage holes in the bottom of the planter section to prevent waterlogging, which can damage roots.
Step 2: Filling the Planters
Fill the bottom section of the bottle with moist seed-starting mix or light potting soil. Avoid heavy garden soil, as it may compact and hinder root growth.
Fill the soil to about an inch below the cut edge to leave room for watering and planting.
Step 3: Sowing Cabbage Seeds or Planting Seedlings
If using seeds, plant them approximately 1 centimeter (½ inch) deep into the soil. Sow a few seeds per bottle and thin to the strongest seedling once they germinate.
If transplanting seedlings, carefully place a healthy young plant into the soil-filled bottle, firming the soil gently around the roots.
Step 4: Creating the Ideal Environment
Lightly water the soil to moisten it evenly. Avoid overwatering, which can lead to fungal diseases.
Invert the top part of the bottle over the planter to form a mini-greenhouse, trapping moisture and warmth. This setup helps cabbage seeds germinate faster and supports early seedling growth.
Place the bottle planters in a bright location with indirect sunlight. Cabbage seedlings prefer cooler temperatures around 15°C to 20°C (59°F to 68°F).
Step 5: Caring for Cabbage Starters
Keep the soil consistently moist but not soggy by misting with a spray bottle or watering gently when needed.
Once seedlings emerge, gradually remove the bottle tops during the day to reduce humidity and prevent mold buildup.
Ensure the seedlings receive adequate light—ideally 12 to 16 hours per day—to prevent leggy growth. Supplemental grow lights can be used if natural light is insufficient.
Step 6: Transplanting into the Garden
When seedlings grow 10 to 15 centimeters (4 to 6 inches) tall with several true leaves, they are ready for transplanting.
Hardening off the seedlings before planting outdoors is crucial. Gradually expose them to outdoor conditions over a week by increasing the time spent outside each day.
Plant the cabbage starts into well-prepared garden beds with fertile, well-draining soil, spacing them according to the variety’s needs.
Benefits of Propagating Cabbage in Bottles
-
Faster Growth: The mini-greenhouse effect accelerates germination and early development.
-
Reduced Waste: Reusing bottles promotes environmentally conscious gardening.
-
Convenience: Bottle planters are portable and easy to manage indoors or in small spaces.
-
Early Monitoring: Transparent bottles allow observation of root and soil conditions.
-
Economical: Saves money on seed trays and starter pots.
Tips for Success
-
Use fresh, high-quality cabbage seeds for better germination rates.
-
Avoid overwatering to prevent fungal diseases such as damping-off.
-
Label each bottle with seed variety and sowing date for easy tracking.
-
Keep humidity dome in place only until seedlings emerge to prevent mold growth.
-
Rotate bottles periodically for even light exposure.
Troubleshooting Common Problems
-
Mold or Fungus: Increase ventilation and reduce watering frequency. Remove humidity dome if necessary.
-
Leggy Seedlings: Provide more light or reduce humidity slightly.
-
Poor Germination: Check seed quality and soil temperature. Maintain consistent moisture.
Conclusion
Propagating cabbage in recycled plastic bottles is an innovative and practical shortcut to growing healthy cabbage plants. This method is ideal for gardeners who want to start seedlings indoors or have limited space, while promoting sustainability through reuse of materials.
By following the simple steps of preparing bottles, sowing seeds, maintaining the right environment, and transplanting seedlings at the right time, you can enjoy a successful cabbage growing season. This approach not only saves money but also helps reduce plastic waste, making your gardening journey both productive and eco-friendly.


