Garlic is a kitchen essential, valued for its flavor, aroma, and health benefits. While traditionally grown in garden beds, it can also be propagated quickly and easily using a simple bottle setup. This method encourages fast root development, requires minimal space, and works perfectly for home gardeners who want to grow garlic indoors or in small areas. By using recycled plastic bottles, you not only save space and reduce waste but also create a controlled environment that speeds up rooting.
Why Root Garlic in Bottles?
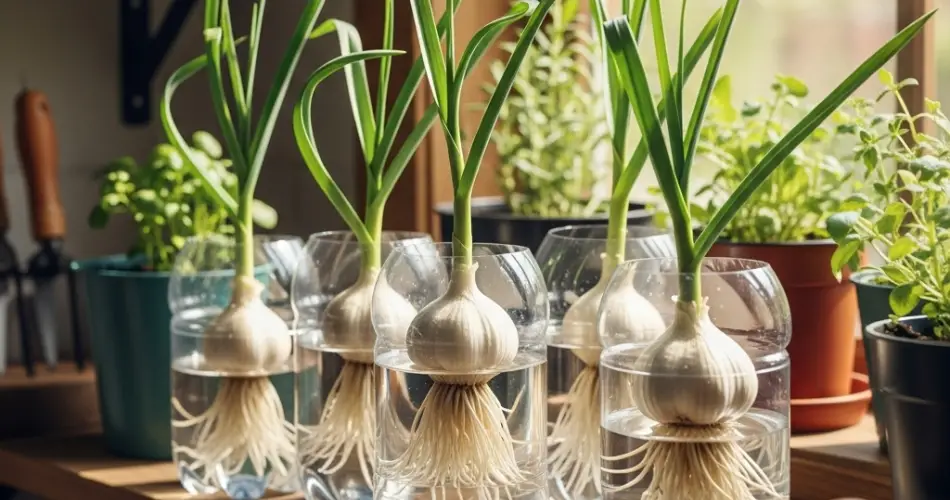
Rooting garlic in bottles is ideal for gardeners with limited space, as it requires no traditional soil bed. The method works by placing cloves in a small water reservoir inside a bottle, which encourages rapid root growth before planting them in soil. This step jump-starts the growing process and can lead to stronger plants and earlier harvests.
Plastic bottles are also easy to handle, lightweight, and can be moved to optimal light or temperature conditions. Plus, reusing bottles helps reduce environmental waste.
Materials You’ll Need
Before you start, gather the following items:
-
Large plastic bottle (1.5–2 liters)
-
A sharp knife or scissors
-
Fresh garlic cloves (choose large, healthy ones)
-
Water
-
Toothpicks or skewers (optional, for suspending cloves)
Preparing the Garlic
-
Select Quality Cloves
Choose firm, plump garlic cloves with intact skins. Avoid cloves that are soft, shriveled, or showing signs of mold. -
Remove Outer Skin
Gently peel away the loose, papery outer layers without damaging the clove itself. This helps roots emerge more easily. -
Check the Growing Point
Identify the pointed end (where the sprout will grow) and the flat basal plate (where roots will form). The basal plate should remain intact for successful rooting.
Setting Up the Bottle System
-
Cut the Bottle
Using scissors or a knife, cut the bottle horizontally about one-third of the way down from the top. The bottom section will hold the water, and the top can be inverted and used as a holder. -
Position the Cloves
There are two main methods for positioning garlic cloves in the bottle:-
Suspension Method: Use toothpicks or skewers inserted into the sides of each clove to suspend it over the water, with only the basal plate touching the surface.
-
Tray Method: Place cloves on a small mesh or the inverted bottle top so that their bases touch the water below.
-
-
Add Water
Fill the bottom section of the bottle with enough water to just touch the basal plate of each clove. Avoid submerging the entire clove to prevent rotting. -
Place in Bright, Indirect Light
Position the setup near a sunny window where it will receive plenty of light without overheating.
Caring for Rooting Garlic
-
Water Maintenance: Check the water daily to ensure it still touches the clove’s base. Change the water every 2–3 days to keep it fresh and oxygenated.
-
Light and Temperature: Garlic roots best in a bright, warm environment between 18–24°C (65–75°F). Avoid placing it in direct hot sunlight for prolonged periods.
-
Observation: Roots should start appearing within 4–7 days. You may also see green shoots emerging from the top of the clove.
Transplanting Rooted Cloves
Once roots are about 2–3 cm long and the shoot is well-formed, the garlic is ready to be transplanted into soil. This can be in a garden bed, a pot, or even a larger container.
Steps for Transplanting:
-
Prepare loose, well-draining soil enriched with compost.
-
Plant cloves with the sprouted end facing upward, about 5 cm deep.
-
Space multiple cloves at least 10–15 cm apart to allow room for bulb formation.
-
Water thoroughly after planting.
Advantages of Bottle Rooting for Garlic
-
Fast Results: Roots form quickly in water, giving the plant a head start.
-
Easy Monitoring: You can see root growth without disturbing the plant.
-
Space-Saving: Ideal for small homes, balconies, or kitchens.
-
Eco-Friendly: Reuses plastic bottles instead of throwing them away.
-
Beginner-Friendly: No complex equipment or large garden space needed.
Troubleshooting Tips
-
Clove Rotting: If the water smells bad or the clove turns mushy, it may be submerged too deeply. Adjust the water level and start with a fresh clove.
-
No Root Growth: Check that the basal plate is touching the water. Also, make sure the clove is healthy and not too old.
-
Weak Shoots: Ensure the cloves get enough light. If growing indoors during short days, consider using a small grow light.
Final Thoughts
Rooting garlic cloves in bottles is a simple, effective, and eco-friendly gardening method that’s perfect for starting your garlic crop. By giving your cloves a strong root system before planting, you set them up for healthier growth and better yields. Whether you have a large garden or just a sunny windowsill, this technique offers a quick way to begin growing your own fresh garlic at home.


