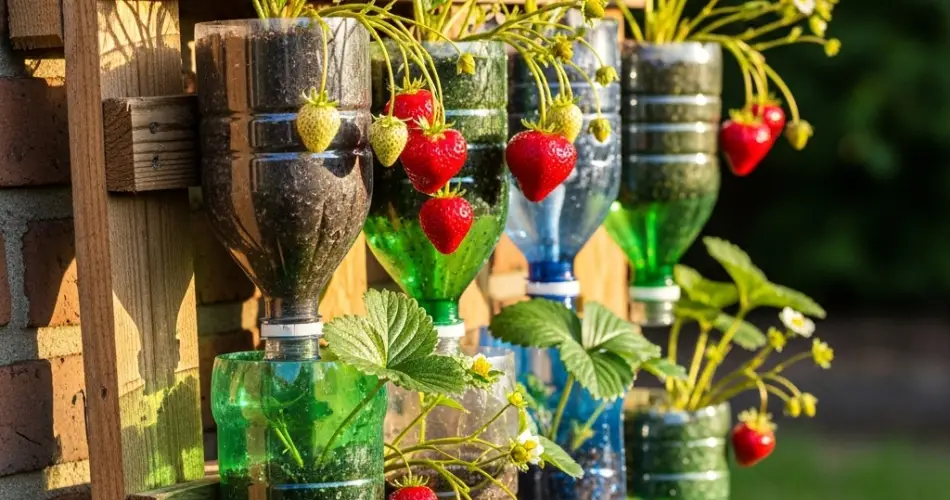
Strawberries are one of the most rewarding fruits to grow at home. Their sweet, juicy flavor and bright red color make them a favorite for both children and adults. While many gardeners purchase new seedlings each season, there is a simple and eco-friendly way to multiply your strawberry crop without spending extra money: bottle propagation. By using upcycled bottles as mini planters, you can propagate strawberry runners efficiently, save space, and reduce waste at the same time.
This method is not only cost-effective but also ideal for urban gardeners who have limited outdoor space. With a few bottles, some soil, and healthy strawberry plants, you can build a productive strawberry system that yields fresh fruit season after season.
Why Propagate Strawberries in Bottles?
Strawberries naturally spread through runners, also called stolons. These long stems grow out from the main plant and produce small nodes that can take root and grow into new plants. By capturing these runners in bottle planters, you give them a controlled space to develop strong roots before moving them into larger containers or garden beds.
Using bottles has several advantages:
-
Eco-friendly: Reduces plastic waste by repurposing bottles.
-
Budget-friendly: Eliminates the need to buy new seedling trays or pots.
-
Space-efficient: Bottles are compact and can fit on windowsills, balconies, or patios.
-
Controlled growth: Each runner gets its own mini space, ensuring healthy, independent plants.
What You’ll Need
Before starting, gather these simple materials:
-
Healthy strawberry plants with runners
-
Plastic bottles (1–2 liters are ideal)
-
Scissors or a sharp knife
-
Potting soil or compost-rich garden soil
-
Watering can or spray bottle
-
Small stones or pebbles for drainage
Optional: Natural fertilizer or compost tea for boosting growth once roots develop.
Preparing Your Bottle Planters
-
Take a clean plastic bottle and cut it horizontally about one-third of the way from the top.
-
Use the bottom portion as your planter. Poke 2–3 small drainage holes in the base to prevent water from collecting.
-
If desired, you can use the top half as a funnel by inverting it into the bottom half or create a hanging planter by attaching strings.
-
Place a thin layer of small stones or pebbles at the bottom for drainage, then fill the bottle with nutrient-rich soil.
This simple setup transforms everyday waste into a practical container for growing strawberries.
Planting Strawberry Runners
-
Look for long, healthy runners on your strawberry plant. Each runner will have a small node with tiny leaves or roots starting to form.
-
Position the node onto the soil-filled bottle planter while keeping the runner connected to the mother plant.
-
Gently press the node into the soil and secure it with a small stone, bent wire, or toothpick so it stays in contact with the soil.
-
Water lightly to moisten the soil without soaking it.
Over the next 2–3 weeks, the runner will begin developing its own root system in the bottle. During this time, the mother plant continues to provide nutrients through the runner stem.
Caring for Your Bottle Plants
-
Sunlight: Place your bottle planters in a location with at least 6 hours of sunlight per day.
-
Watering: Keep the soil evenly moist, but avoid waterlogging. Bottles can dry out quickly, so check the soil daily.
-
Fertilizing: After the new plant begins to root, feed it with diluted compost tea or organic fertilizer every two weeks.
By giving your strawberry runners individual attention in bottles, you ensure stronger, healthier plants ready for transplanting.
Separating and Transplanting New Plants
Once the new strawberry plant has developed several roots and at least 3–4 leaves, it is ready to grow independently.
-
Snip the stem that connects the runner to the mother plant.
-
Gently remove the rooted plant from the bottle planter.
-
Transfer it to a larger container, raised bed, or garden plot filled with fertile, well-draining soil.
-
Water thoroughly and continue providing sunlight and care.
By repeating this process for each runner, you can multiply your strawberry crop quickly and inexpensively.
Harvesting and Enjoying Homegrown Strawberries
With proper care, newly propagated strawberry plants can begin bearing fruit within a few months, depending on the season and variety. Regular watering, sunlight, and soil nutrition will ensure healthy growth and abundant harvests. Once berries turn bright red and firm, pick them immediately to enjoy their full sweetness and flavor.
Benefits of Bottle Propagation for Strawberries
-
Recycling at its best: Gives bottles a second life as mini planters.
-
Continuous supply: Provides a steady stream of new strawberry plants for years to come.
-
Small-space friendly: Perfect for balconies, patios, and even indoor windowsills.
-
Cost-saving: Eliminates the need to buy new plants each season.
-
Satisfying and fun: Watching new plants develop is rewarding and educational.
Conclusion
Bottle propagation is a clever, sustainable, and effective way to multiply your strawberry crop. By reusing plastic bottles, you not only reduce waste but also create a practical system for propagating strawberry runners. With just a little effort, you can turn a single plant into many, ensuring a continuous harvest of fresh, sweet strawberries. This eco-friendly method proves that with creativity and care, you can enjoy the taste of homegrown fruit while contributing to a more sustainable lifestyle.


