Propagating pepper seedlings using plastic bottles is a simple, efficient, and eco-friendly way to start a home vegetable garden. Whether you’re growing sweet bell peppers or fiery hot chili varieties, this method gives you control over the early stages of growth while recycling everyday materials. Plastic bottles serve as mini greenhouses, creating a warm and humid environment that encourages faster germination and healthier seedlings.
This step-by-step guide will show you how to successfully propagate pepper seedlings in plastic bottles and prepare them for transplanting into garden beds or larger containers.
Why Use Plastic Bottles for Propagation?
Plastic bottles are excellent for propagation due to their ability to trap heat and moisture—two critical factors for germinating pepper seeds. The clear sides allow light to penetrate while helping you monitor soil moisture and root development. Using plastic bottles also reduces waste, making this method sustainable and cost-effective. It’s perfect for balcony gardeners, beginners, and anyone working with limited space.
Materials You’ll Need
-
Clean, clear plastic bottles (1–2 liter size)
-
Scissors or a utility knife
-
Pepper seeds (bell peppers, cayenne, jalapeños, etc.)
-
Seed-starting soil mix (light and well-draining)
-
Spray bottle or small watering can
-
Toothpick or small stick (for seed planting)
-
Tray or shallow container (to catch excess water)
Optional:
-
Permanent marker (to label varieties)
-
Compost tea or diluted organic fertilizer (for feeding later on)
Step 1: Prepare the Bottles
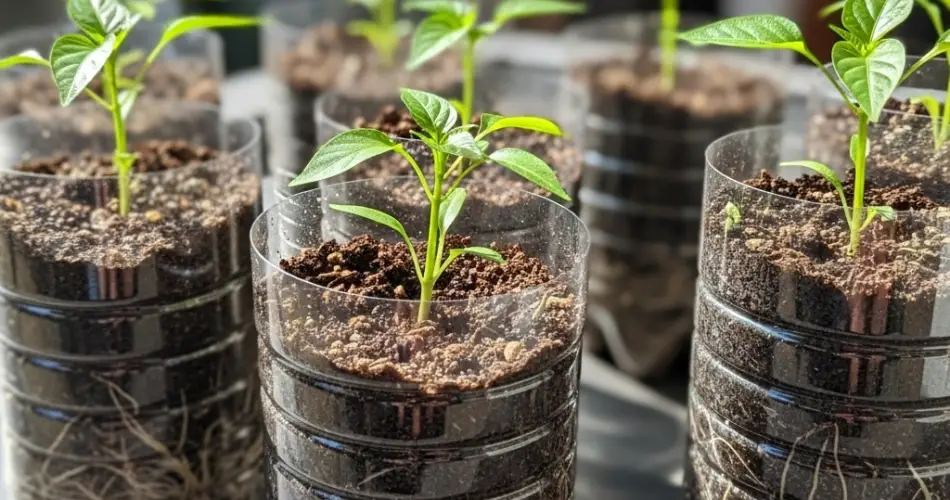
Start by washing your plastic bottles thoroughly to remove any residue. Once dry, cut each bottle horizontally about two-thirds from the base. The bottom part will hold the soil, and the top can be used as a humidity dome if needed.
Poke 3–5 small holes in the base of the lower section for drainage. This step is crucial to prevent water buildup, which can lead to root rot and fungal problems.
Step 2: Fill with Soil
Add a light seed-starting mix into the bottle base. Avoid heavy garden soil, which can compact and make it difficult for tender roots to grow. A good mix includes coconut coir or peat moss, compost, and a bit of perlite or sand to improve drainage.
Fill the container about three-quarters full, gently patting the soil to remove large air pockets. Lightly mist the soil with water to moisten it before planting.
Step 3: Plant the Pepper Seeds
Pepper seeds should be planted about ¼ inch deep. Use a toothpick, stick, or your finger to poke small holes in the soil, spacing seeds at least 1 inch apart. Drop one seed into each hole, then cover lightly with soil.
Mist the surface again to ensure good seed-to-soil contact. If you’re using the top part of the bottle as a dome, place it over the base to maintain humidity.
Label the bottles if you’re propagating multiple pepper varieties.
Step 4: Provide Warmth and Light
Pepper seeds require warmth to germinate, ideally between 75°F and 85°F (24°C to 29°C). Place the bottles in a warm, sunny location such as a windowsill, or near a heat source if temperatures are cool. Avoid direct hot sunlight during the early stages to prevent overheating.
If using the dome, remove it for a few minutes daily to allow fresh air in and prevent mold buildup. Keep the soil moist but not soggy by misting as needed.
Step 5: Germination and Early Growth
Pepper seeds typically germinate in 7 to 14 days. Once seedlings emerge, remove the dome permanently and move the bottles to a spot that receives bright, indirect sunlight or use grow lights.
When the seedlings develop two to four true leaves, thin them out by snipping the weaker ones at soil level. This allows the stronger plants to grow without competition.
Keep the soil consistently moist and begin light feeding with compost tea or diluted organic fertilizer once the seedlings are a few weeks old.
Step 6: Preparing for Transplanting
After 4–6 weeks, your pepper seedlings should be strong enough for transplanting. Before moving them outdoors, harden them off by gradually exposing them to outdoor conditions over 5–7 days. Start by placing the bottles in a shaded outdoor area for a few hours a day, increasing exposure to sunlight and wind gradually.
When transplanting, carefully remove each seedling from the bottle. You can either cut the bottle to free the plant or gently scoop out the seedling with soil intact.
Transplant into a larger container or directly into garden beds, spacing plants about 12 to 18 inches apart.
Final Thoughts
The bottle propagation method is a practical, budget-friendly way to grow healthy pepper seedlings at home. It requires minimal tools, recycles plastic waste, and offers an ideal microclimate for starting seeds. Whether you’re growing on a balcony, windowsill, or small backyard, this method helps you raise vigorous pepper plants ready to produce a flavorful harvest. With just a bit of care and patience, you’ll soon enjoy your own homegrown peppers straight from seed to table.


