Garlic is a versatile, flavorful, and nutrient-rich crop that can easily be grown at home—even without a traditional garden. One innovative and space-saving method for growing garlic involves using recycled plastic bottles. This DIY setup not only promotes sustainability but also ensures a steady supply of fresh garlic, perfect for home cooks and urban gardeners alike. Whether you’re growing indoors on a sunny windowsill or on a balcony, this method offers an efficient way to propagate garlic cloves with minimal materials and space.
Why Grow Garlic in Bottles?
Growing garlic in plastic bottles is ideal for those who have limited garden space or live in apartments. This technique takes advantage of vertical space and allows for controlled drainage, light exposure, and easier pest management. Plus, garlic has relatively simple growth requirements and adapts well to container conditions.
Materials Needed
To start growing garlic in bottles, you’ll need the following:
-
Transparent or semi-transparent plastic bottles (1.5 to 2 liters recommended)
-
Sharp scissors or a knife
-
Garlic cloves (preferably organic)
-
Potting soil or a mix of compost and garden soil
-
Small pebbles or charcoal (optional, for drainage)
-
A small stick or spoon for filling and arranging soil
Preparing the Bottle
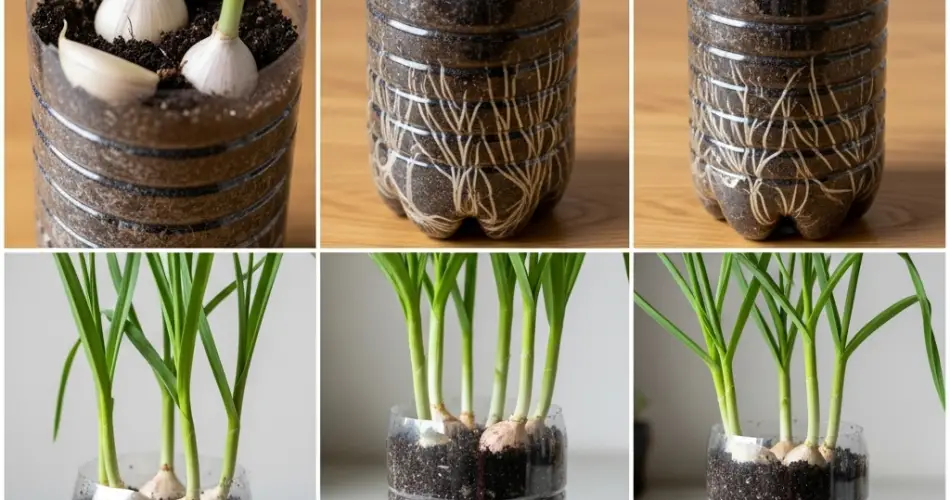
Begin by thoroughly washing and drying the plastic bottle. Use scissors or a knife to cut off the top third of the bottle—this will become your planting chamber. Next, poke or drill small holes at the bottom of the bottle to allow for proper drainage. If you’re using pebbles or charcoal, place a thin layer at the bottom to prevent water from pooling and causing root rot.
Cut small planting holes around the sides of the bottle, spaced a few inches apart. These openings will hold the garlic cloves, allowing them to sprout and grow outward. The number of holes you create depends on the size of the bottle—generally, 4–6 cloves can fit comfortably in a 2-liter bottle.
Preparing and Planting Garlic Cloves
Choose healthy, firm garlic cloves. Avoid using any that show signs of mold or softness. It’s best to use garlic that hasn’t been treated with growth inhibitors, which are often found in imported store-bought garlic. Locally sourced or organic garlic tends to perform better.
Gently separate the garlic bulb into individual cloves without peeling them completely. Position each clove with the pointed end facing up and the root end down. Place them into the side holes of the bottle, filling soil gradually to support each clove. You can also plant a few cloves at the top of the bottle if space allows.
Fill the bottle with soil in layers, positioning the cloves in each hole as you go. Lightly press the soil down to secure each clove in place. Be sure not to overfill or compact the soil too tightly—roots need space to grow and breathe.
Watering and Light Requirements
Garlic prefers moist but not soggy soil. After planting, water the bottle thoroughly, allowing excess moisture to drain out from the bottom holes. Keep the soil consistently moist, especially during the early stages of growth, but avoid overwatering.
Place the bottle in a sunny spot, such as a windowsill or balcony that receives at least 6 hours of sunlight per day. Garlic thrives in full sun and needs warmth to grow robust bulbs. If natural light is limited, consider supplementing with a small grow light.
Growth Timeline and Maintenance
You’ll notice green shoots appearing within a week or two after planting. These shoots, known as garlic scapes, are edible and can be harvested for culinary use even before the bulb fully matures.
Garlic takes about 3 to 4 months to reach maturity when grown in containers. During this time, monitor the moisture levels regularly and occasionally rotate the bottle if sunlight hits only one side. Remove any yellowing leaves to maintain plant health and ensure energy is directed to bulb development.
If the top growth becomes too tall, gently trim it or use a small stick to provide light support. Keep the growing area clean and watch for pests like aphids or fungus gnats. Fortunately, garlic’s natural sulfur compounds often deter common pests.
Harvesting Your Garlic
Once the lower leaves start to yellow and dry out—typically after 90–120 days—it’s a sign that your garlic is ready for harvest. Gently pull the bulbs from the bottle, being careful not to damage them. Brush off any excess soil and allow the bulbs to cure in a dry, shaded, and well-ventilated area for about two weeks.
After curing, you can trim the roots and tops, and store the garlic in a cool, dry place for future use. Alternatively, save a few cloves from your harvest to replant for your next cycle of bottle-grown garlic.
Final Thoughts
Growing garlic in bottles is a creative and eco-friendly solution for urban gardening. It’s affordable, space-efficient, and produces fresh, homegrown garlic without the need for a traditional garden. Whether you’re a beginner or seasoned gardener, this method offers a satisfying way to enjoy the rewards of your own edible garden right from your kitchen or balcony.


