If you’re itching to spice up your culinary adventures and have a penchant for unique gardening ideas, here’s a game-changer – growing chilies in plastic bottles. This innovative and sustainable approach not only transforms discarded bottles into thriving gardens but also brings the fiery delight of homegrown chilies right to your doorstep. Let’s explore this unique idea and embark on a journey to grow your own chilies at home.
1. Gather Your Materials: Begin by collecting your supplies – plastic bottles (preferably 2-liter ones), potting soil, chili seeds or seedlings, a sharp knife or scissors, and a sunny spot for your mini chili garden.
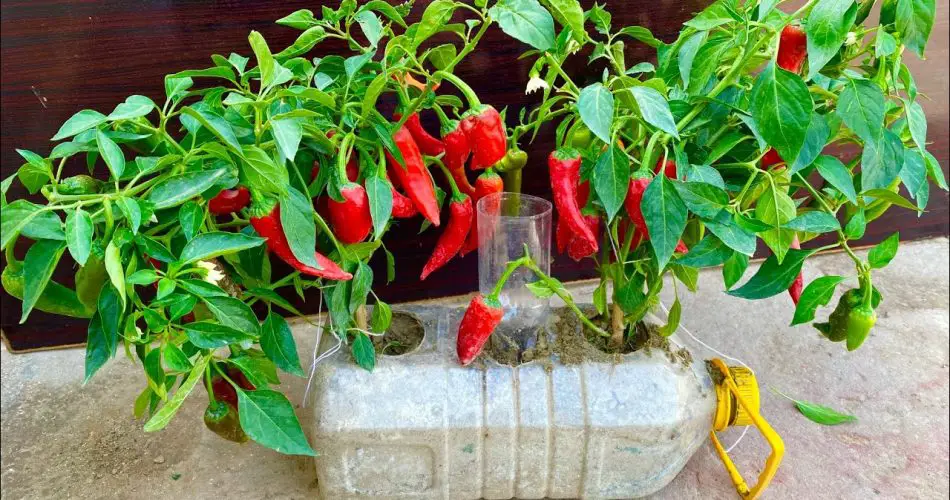
2. Prepare the Plastic Bottles: Cut the plastic bottles horizontally, creating two distinct pieces. The bottom half will serve as a pot for planting, while the top half becomes a protective cover for your emerging chili plants.
3. Create Drainage Holes: Ensure proper drainage by poking a few holes in the bottom of each plastic bottle. Adequate drainage prevents waterlogged soil and promotes healthier roots.
4. Fill with Potting Soil: Load the bottom halves of the plastic bottles with well-draining potting soil. Leave some space at the top to prevent soil spillage when watering.
5. Choose Your Chili Seeds or Seedlings: Select your favorite chili variety, whether it’s fiery jalapeños, Thai chilies, or mild bell peppers. Opt for seeds or seedlings, depending on your preference and gardening experience.
6. Planting in Plastic Bottle Pots: Plant chili seeds or insert seedlings into the soil within the plastic bottles. If using seeds, plant them at a depth of 1/4 to 1/2 inch. For seedlings, ensure they are centered in the soil.
7. Water and Sunlight: Water the soil thoroughly after planting and place the plastic bottles in a sunny location. Chilies thrive with at least 6 hours of sunlight each day.
8. Plastic Bottle Greenhouse: Cover the plastic bottles with their tops to create a makeshift greenhouse. This simple technique helps retain warmth and humidity, fostering optimal conditions for seed germination and early growth.
9. Regular Watering Routine: Keep the soil consistently moist but avoid overwatering. Water your chili plants whenever the top inch of soil feels dry.
10. Transplant and Support: Once your chili plants have grown a few inches tall and developed sturdy roots, transplant them into larger containers or directly into your garden. Consider providing support, such as stakes, as the plants grow.
11. Fertilize for Growth: Post-transplantation, give your chili plants a boost by adding a balanced fertilizer. This will support healthy growth and enhance fruit development.
12. Harvest Your Homegrown Spice: As your chili plants start to flower and bear fruit, get ready for the harvest. Pick your chilies when they reach the desired size and color, and watch your unique homegrown spice come to life.
Growing chilies in plastic bottles is not just a gardening endeavor; it’s a sustainable and inventive way to bring the thrill of homegrown spice into your kitchen. With this unique idea, you’ll not only enjoy the fruits of your labor but also contribute to a greener and spicier world. Happy growing!