In a world where recycling and upcycling are becoming increasingly important, creative minds are finding new ways to transform everyday waste into functional and decorative items. One of the most surprising materials you can use for DIY crafts is the humble aluminum can tab. Paired with leftover wool yarn, these small objects can be turned into something truly unique—a handmade keychain in the shape of a heart.
This simple project requires only a handful of materials, a bit of patience, and some creativity. Whether you want to make a small gift for a friend, a fun activity for kids, or just a personalized accessory for yourself, this craft is perfect. Let’s walk through the process step by step.
Why Use Can Tabs and Yarn?
Before diving into the tutorial, let’s pause to appreciate the beauty of this project. Can tabs are usually thrown away without a second thought, yet they are sturdy, lightweight, and easy to manipulate. Combined with yarn, which comes in endless colors and textures, they can be repurposed into a variety of items—from bracelets and necklaces to bags and even belts.
By making a heart-shaped keychain, you not only create something stylish and meaningful, but you also contribute to reducing waste. Plus, each piece is one-of-a-kind, because it’s handmade. This makes it an ideal gift, especially for occasions where a personal touch is valued—such as birthdays, anniversaries, or children’s parties.
Materials You’ll Need
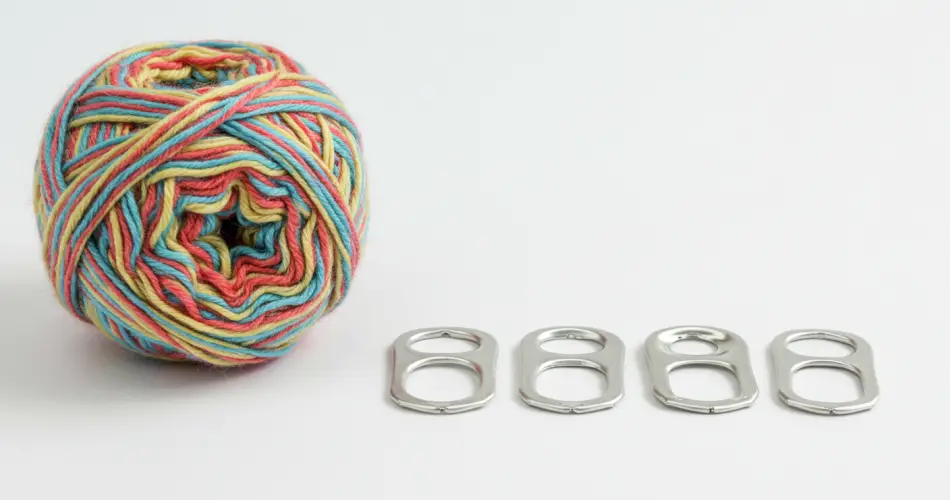
For this DIY project, gather the following supplies:
-
4 aluminum can tabs (washed and dried)
-
Wool yarn in your favorite color (or multiple colors if you want to mix designs)
-
A medium-sized needle with an eye large enough for the yarn to pass through
-
One bead (optional, for decoration)
-
A key ring or keychain clip
That’s it! Most of these items are either already at home or inexpensive to buy.
Step 1: Form the Heart Shape
Take two can tabs and position them so that they overlap slightly at one end, while the opposite ends remain separate. This creates the outline of a heart. Hold the shape firmly in place with your fingers.
Next, thread your needle with wool yarn. Knot the end of the yarn so it doesn’t slip out. Start wrapping the yarn around the point where the two can tabs overlap. This first knot will hold the tabs together securely and serve as the foundation for the heart.
Step 2: Cover the Edges with Yarn
Now, begin wrapping the yarn around the entire contour of the can tabs. This step not only strengthens the structure but also covers the metal, giving the heart a soft and colorful appearance. Continue working around the outline until the entire border of the heart is encased in yarn.
Once you’ve reached the end, knot the yarn securely. At this stage, you’ll have a neat, heart-shaped frame covered in vibrant wool.
Step 3: Create the Inner Weave
The next step is to fill in the interior of the heart. Using the same yarn, pass the needle vertically across the frame, looping the yarn through the knots or spaces along the border. This creates a crisscrossed effect inside the heart, similar to weaving.
You can choose to stick with one color for a clean, uniform look, or switch to a second color halfway through to add contrast. For example, you might outline the heart in red yarn and then weave the inside with white. To change colors, simply knot the first yarn securely, cut it, and begin with the second color.
The weaving step adds dimension and strength to the heart, transforming it from a simple outline into a solid decorative piece.
Step 4: Add the Loop and Bead
To turn your heart into a functional keychain, you’ll need to create a loop. Start another round of yarn along the top of the heart. When you reach the center point where you want the loop to be, thread a bead onto the yarn. This adds a decorative touch and secures the loop in place.
Continue wrapping the yarn around the rest of the heart’s outline until you return to your starting point. Tie off the yarn neatly and trim any excess.
Step 5: Attach the Key Ring
Finally, slip a key ring or keychain clip through the loop you created. Your heart-shaped can tab keychain is now ready to use or gift.
Creative Variations
One of the best parts of this project is its flexibility. Here are some ideas to make your keychain even more special:
-
Color Themes: Use yarn in holiday colors (red and green for Christmas, pink and white for Valentine’s Day) to create seasonal designs.
-
Multicolored Weaving: Instead of just one or two colors, use multiple shades of yarn to create a rainbow effect.
-
Add More Beads: Incorporate beads into the weaving process for extra sparkle.
-
Personalize: Attach a small charm or initial to the loop to make it personal for the recipient.
The possibilities are endless, and no two keychains will look exactly alike.
Why This DIY Keychain Makes a Perfect Gift
Handmade gifts carry special meaning because they reflect time, thought, and effort. A heart-shaped keychain made from can tabs and yarn symbolizes love, care, and sustainability all in one. It’s a small but heartfelt gesture that shows creativity and consideration.
These keychains also make great group projects for schools, community workshops, or children’s parties. They’re safe, affordable, and teach kids the value of recycling while letting them express themselves artistically.
Conclusion
With just four can tabs, some wool yarn, and a touch of imagination, you can create a charming heart-shaped keychain that is both practical and beautiful. What might have ended up in the trash is instead transformed into a unique keepsake or gift.
This project proves that upcycling doesn’t have to be complicated—sometimes, the simplest materials lead to the most meaningful creations. Whether you’re crafting for yourself, for a loved one, or simply to explore your creativity, this DIY heart keychain is a fun and rewarding way to give new life to everyday objects.
So gather your yarn, find a few can tabs, and start weaving. You’ll be surprised at how something so simple can turn into something so special.


